 Guidry
Room 3D User Guide
The 3D room editor for GameMaker
Room 3D is a desktop 3D room editor that builds rooms, characters and effects and saves them straight into GameMaker projects, which have no 3D room editor of their own. This guide takes you from your first room to the code that runs it.
1What Room 3D is
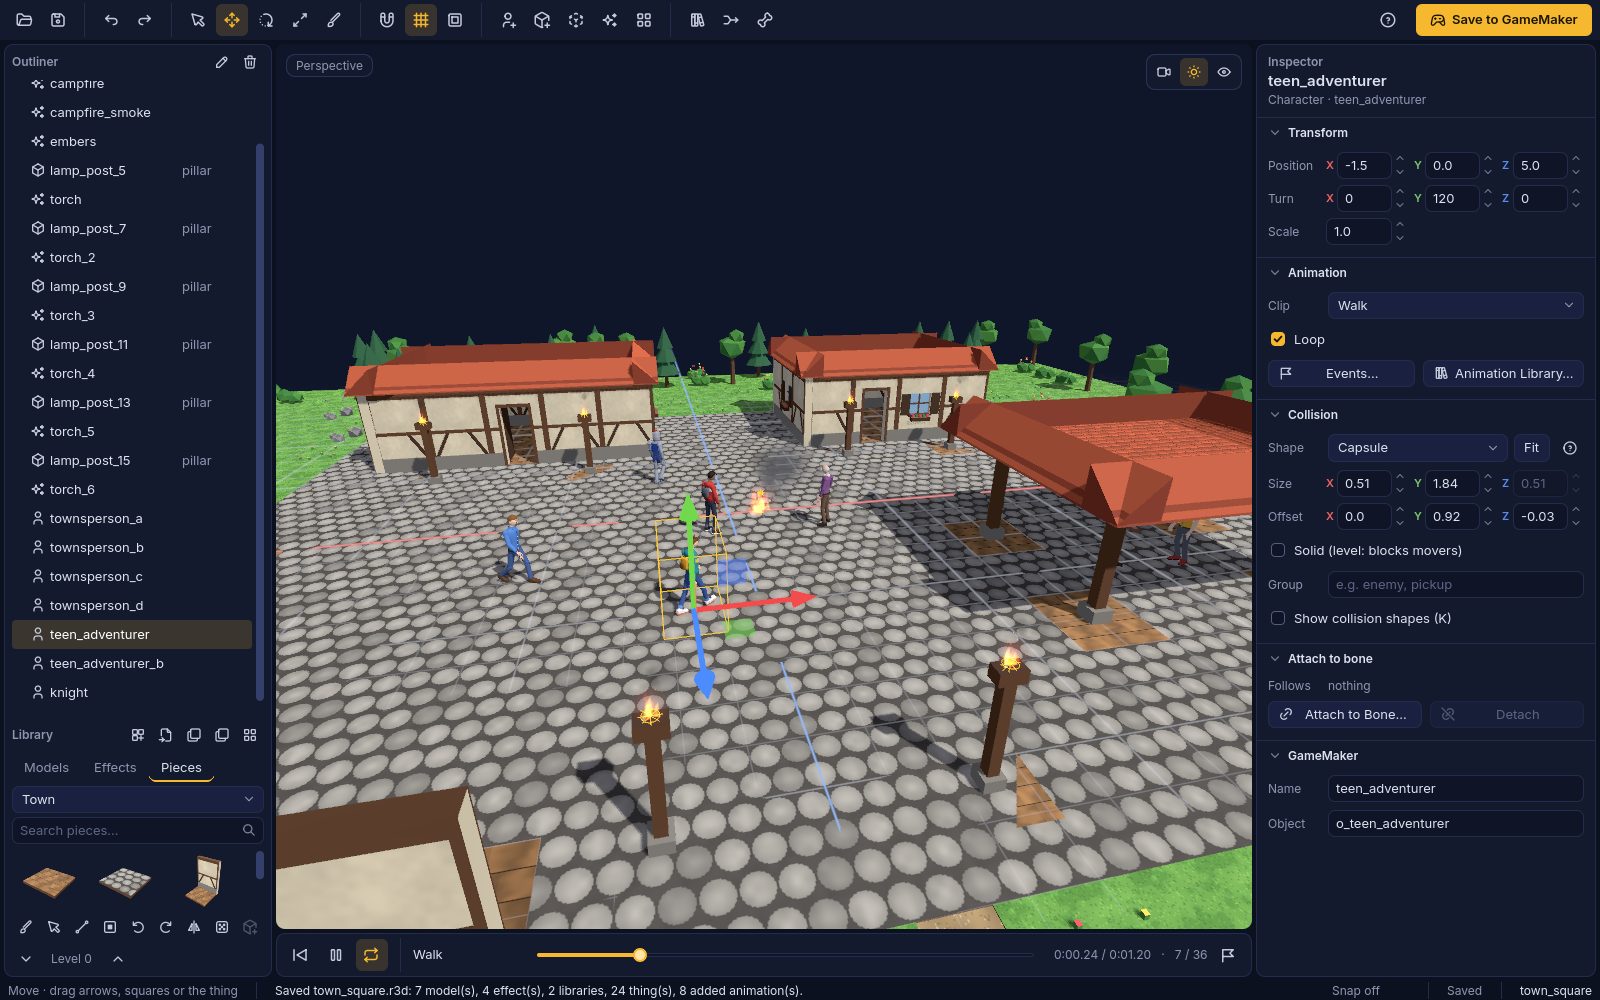
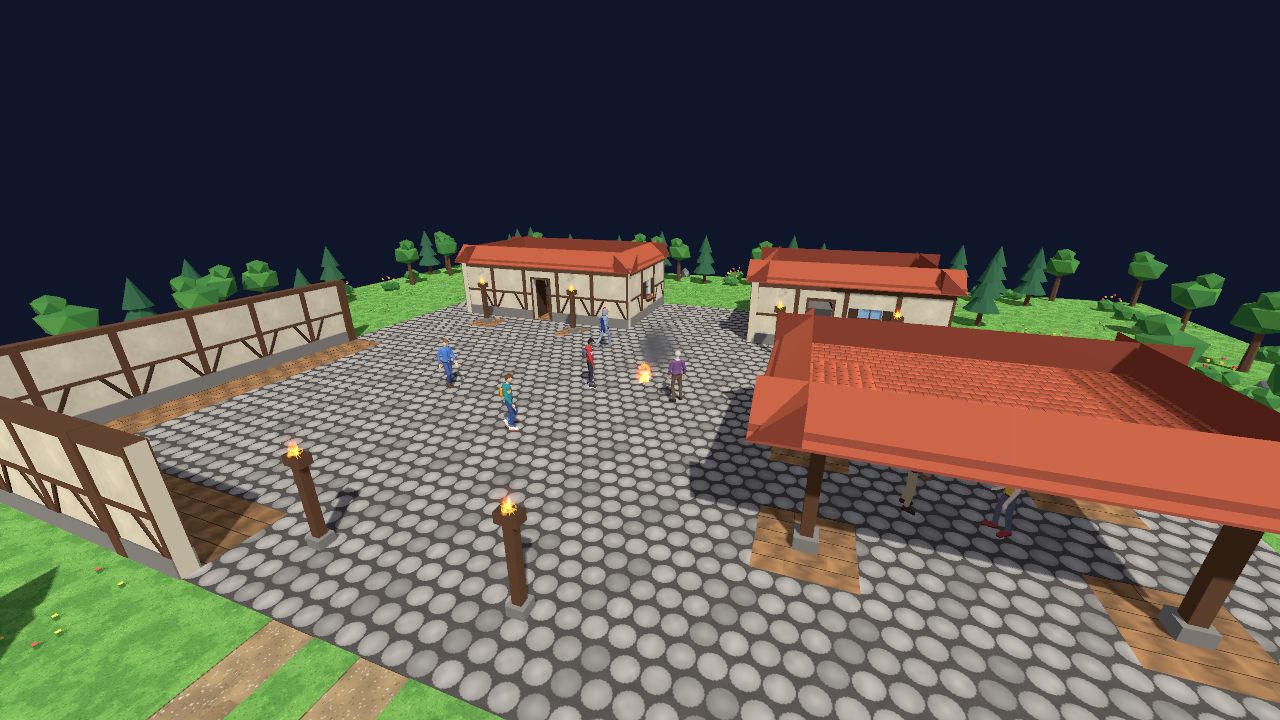
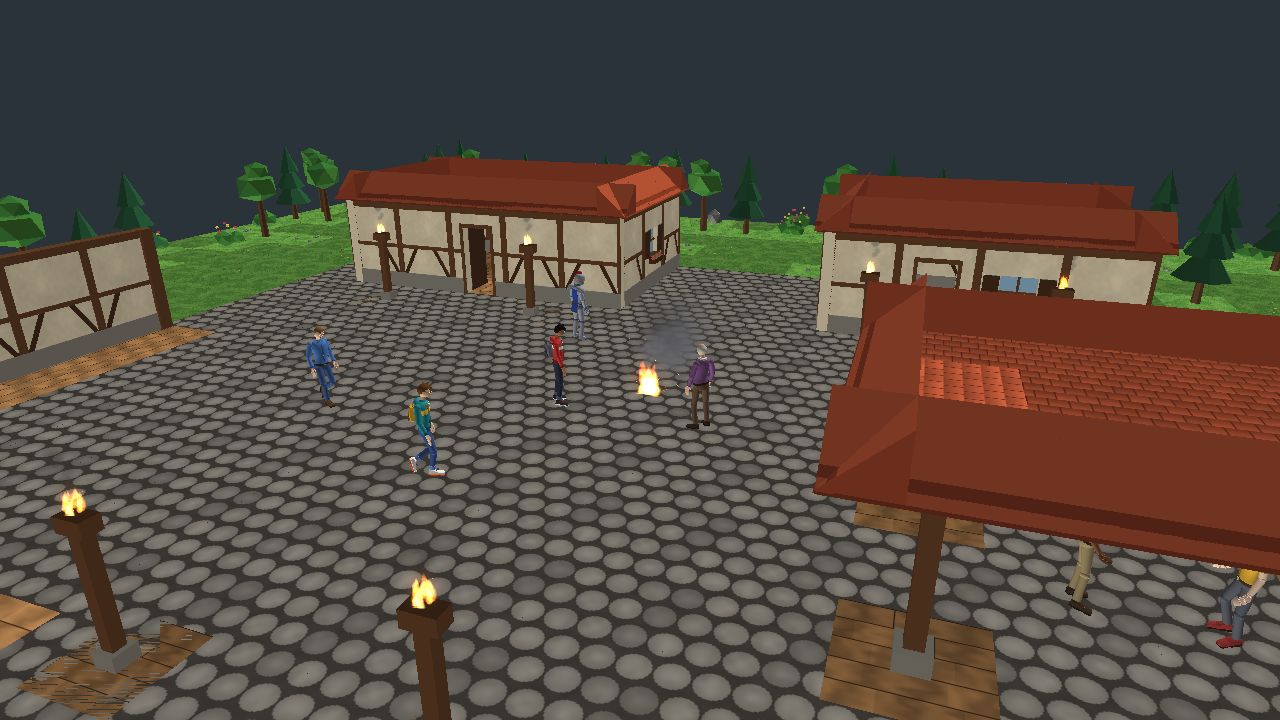
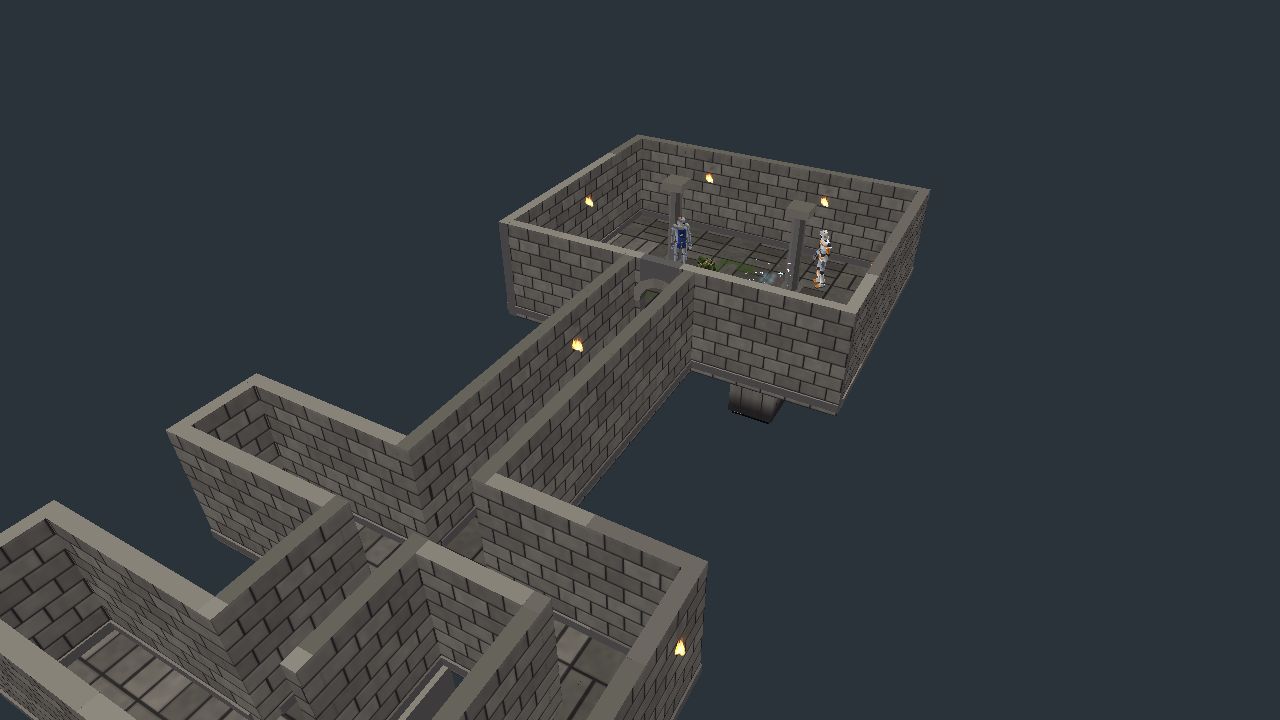
Room 3D lets you build a 3D room by placing models, characters, painted level pieces and particle effects, then saves the whole thing into a GameMaker project with one button. GameMaker opens it as an ordinary room, and a small code kit that Room 3D writes draws it in 3D, plays the animations and handles 3D collision.
- Who it's forGameMaker developers who want 3D levels, characters or scenes without writing a 3D editor themselves.
- PlatformsmacOS (signed and notarized by Apple). Windows and Linux versions are in final testing.
- GameMakerGameMaker LTS 2026 and later.
- TrialEverything works for 7 days of use (only days you open it count).
- After the trialFree mode: you can still open, edit and save projects. Only the three exports (Save to GameMaker, Save Model to GameMaker, Save Model as GLB) need a licence.
- LicenceOne-time purchase, $29.99 at launch, for 2 computers, including every 1.x update. Sold on guidrygames.com.
- Files it opensGLB/glTF (best), FBX (binary and text), OBJ, and Collada (.dae) and .3ds when the free Assimp converter is installed.
2Abilities at a glance
| Area | What you can do |
|---|---|
| Models | Open GLB, glTF, FBX and OBJ files; split multi-object files into separate objects; select, move or hide individual parts; save any model as GLB |
| Placing | Move, turn and scale with handles or exact numbers; snapping; front, side, top and perspective views; undo for everything (200 steps) |
| Collision | Give each object a 3D shape (box, sphere, capsule, convex, mesh) that GameMaker uses for walls, floors, ramps, stairs and hits |
| Premade characters | 11 ready-rigged low-poly characters (mannequin, commando, zombie, knight, robot, teens, townspeople) sharing one skeleton |
| Animation library | Your own folders of FBX, GLB and glTF animations (Mixamo, Meshy or your own), previewed as moving thumbnails and fitted to any humanoid skeleton |
| Rig Character | Give a still humanoid model a skeleton by placing markers; takes a second or two, free and offline |
| Mixamo Assistant | Download characters and animations from Mixamo in your browser; Room 3D brings them in automatically |
| Meshy connection | Use your own Meshy account to make models from text or pictures, remesh, retexture, rig and animate them |
| Animation tools | Loop or play once, mark events on frames (footsteps, hits), attach things to bones (a sword in a hand), combine and trim clips |
| Particle effects | 11 presets (fire, smoke, sparks, explosion, rain, snow and more) and a full effect editor; they look the same in GameMaker |
| Mesh libraries | Paint levels on a 3D grid from piece sets; 4 starter libraries (Dungeon, Sci-fi base, Town, Nature) and 5 templates |
| Import Pieces | Turn a kit file into a library, with collision chosen automatically for each piece and the reason shown |
| Re-theming | Switch a painted level between libraries that share a template in one click |
| Rooms | Keep several rooms in one project, copy and paste between them, save one or all to GameMaker |
| Round trip | Open Room 3D rooms back from a GameMaker project, and reload changes made in GameMaker's room editor |
| GameMaker kit | Code for 3D drawing, animation blending, events, bone attachment, collision, lights, fog, particles and grids |
| Safety | Every save is checked before it replaces the old file; a failed save never damages your project |
| Updates | Checks for updates, downloads and verifies them, installs and restarts, and rolls back if anything fails |
3Getting started
Your first 3D room in GameMaker takes about five minutes:
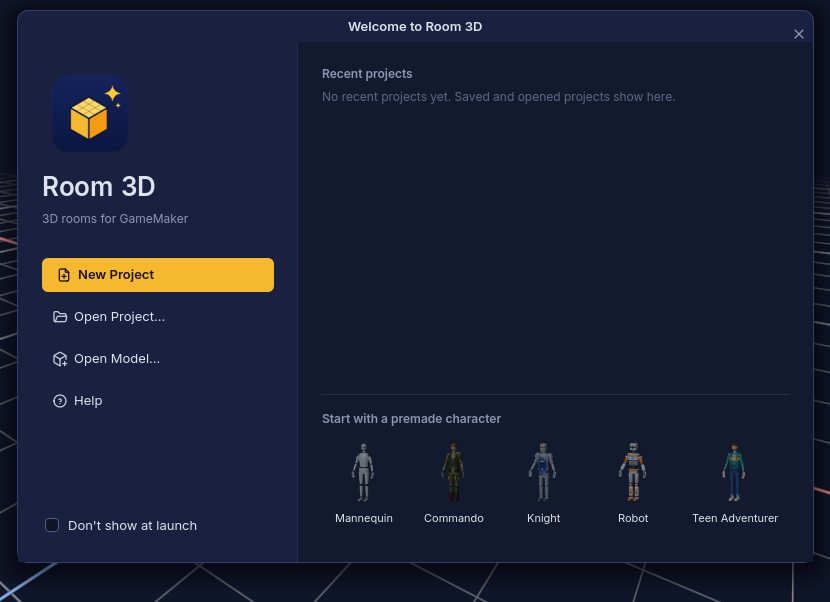
- Open Room 3D. The Welcome window offers New Project, Open Project, Open Model, recent projects and a row of premade characters.
- Add something to the room. Press C and pick a premade character, or choose Add › Model from File… (Cmd/Ctrl+I) for your own GLB, FBX or OBJ. Models land in the Library (bottom left); double-click one to put a copy in the room.
- Arrange it. Click a thing to select it. Press W to move, E to turn, R to scale, or type exact numbers in the Inspector (right).
- Give it an animation. With a character selected, press Cmd/Ctrl+L for the Animation library, click an animation to try it, then Add to model. Pick it in the Inspector's Clip box.
- Paint some floor. Open the Library's Pieces tab, choose the Town or Dungeon library, click a floor piece and drag in the view.
- Add an effect. Press X and pick Campfire or Torch.
- Save the project. Cmd/Ctrl+S keeps your work in a .r3d file.
- Save to GameMaker. Press the gold Save to GameMaker button (Cmd/Ctrl+E), choose your project's .yyp and a room name. Open the project in GameMaker and run it: the room is there in 3D.
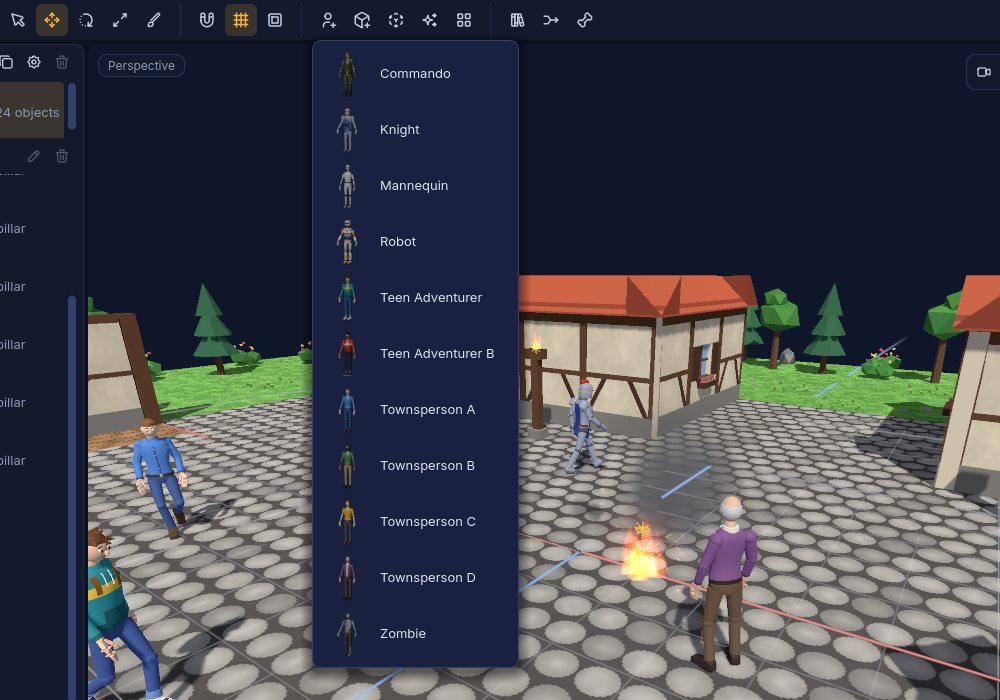
Everything you do can be undone with Cmd/Ctrl+Z, and F1 opens the full help with a search box.
4The window
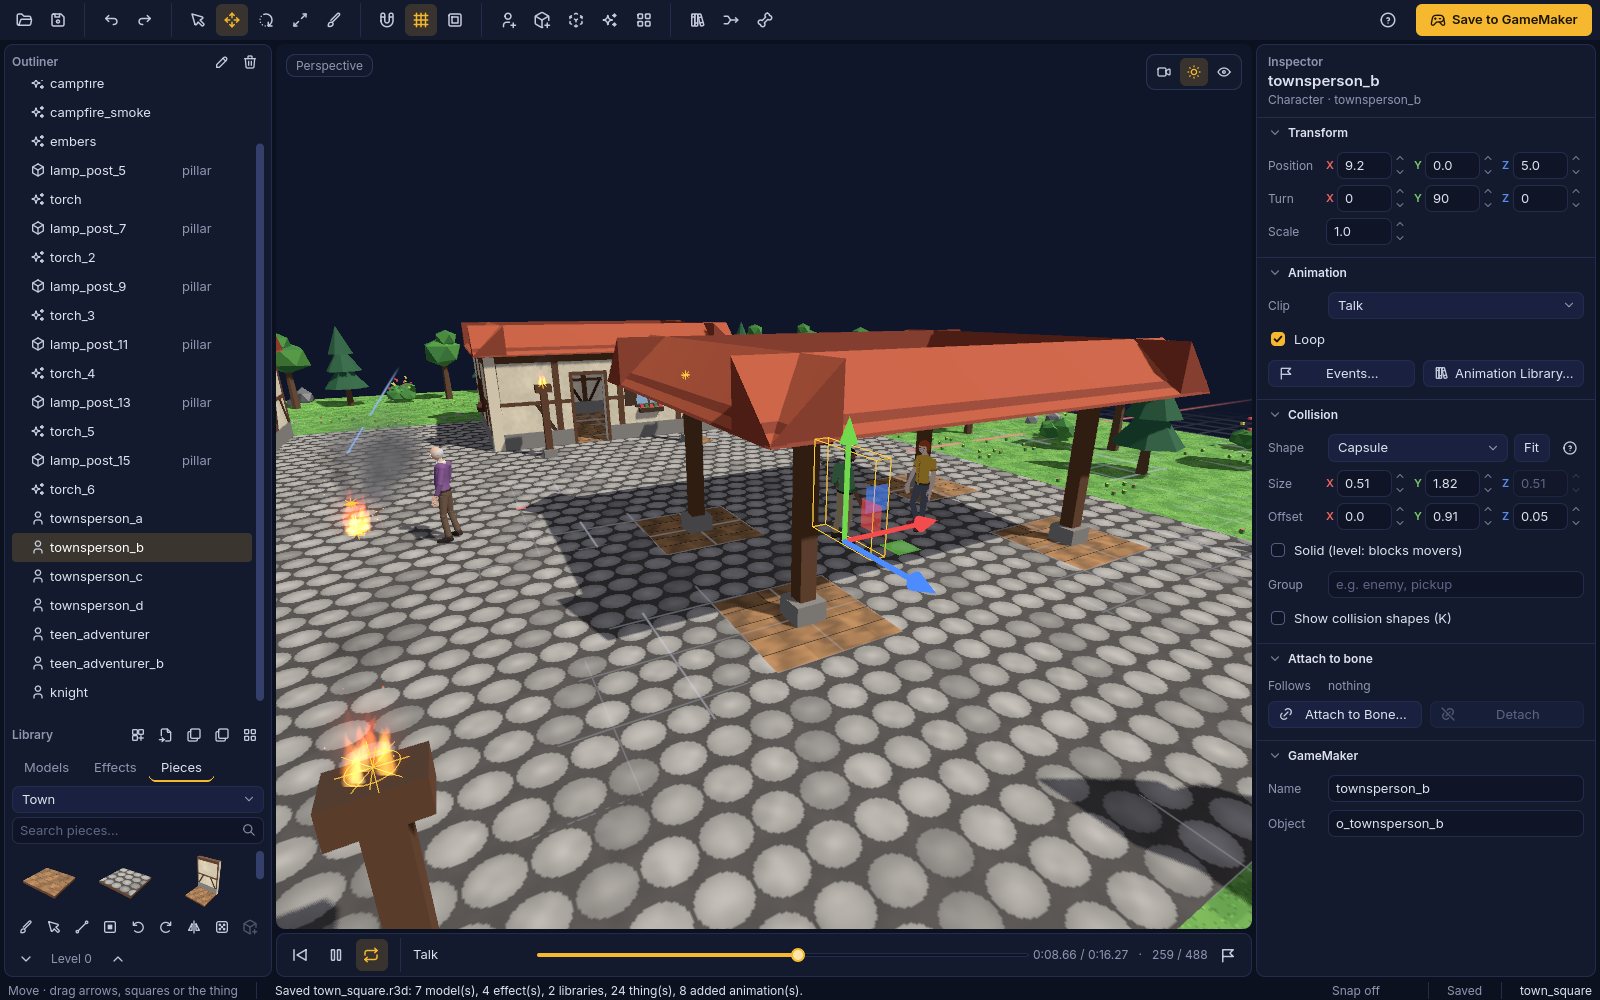
| Area | Where | What it's for |
|---|---|---|
| Menu bar | Top (on a Mac, the system menu bar) | Every command with its shortcut: File, Edit, View, Room, Add, Animation, Export, Window, Help |
| Toolbar | Under the menus | Open, save, undo, the tools, snap, grid, collision view, add buttons, and the gold Save to GameMaker on the right |
| Rooms | Top left | The project's rooms with pictures; click one to open it |
| Outliner | Left, under Rooms | Everything in the open room; rename, select parts, drag to attach to a bone |
| Library | Bottom left | Three tabs: Models, Effects and Pieces (mesh libraries for painting) |
| View | Middle | The room in 3D. Right-drag turns, middle-drag slides, the wheel zooms |
| Timeline | Under the view | Play, pause, loop and scrub the selected thing's animation; gold marks are events |
| Inspector | Right | The selected thing's position, turn, scale, animation, collision, effect, grid, bone and GameMaker name |
| Status bar | Bottom | What the tool does, what just happened, snap state, saved or unsaved, trial or licence |
Drag the gaps between panels to resize them, hide panels with Cmd/Ctrl+1 to 4, and reset the layout with Window › Reset Panel Layout.
5Building a room
Adding models
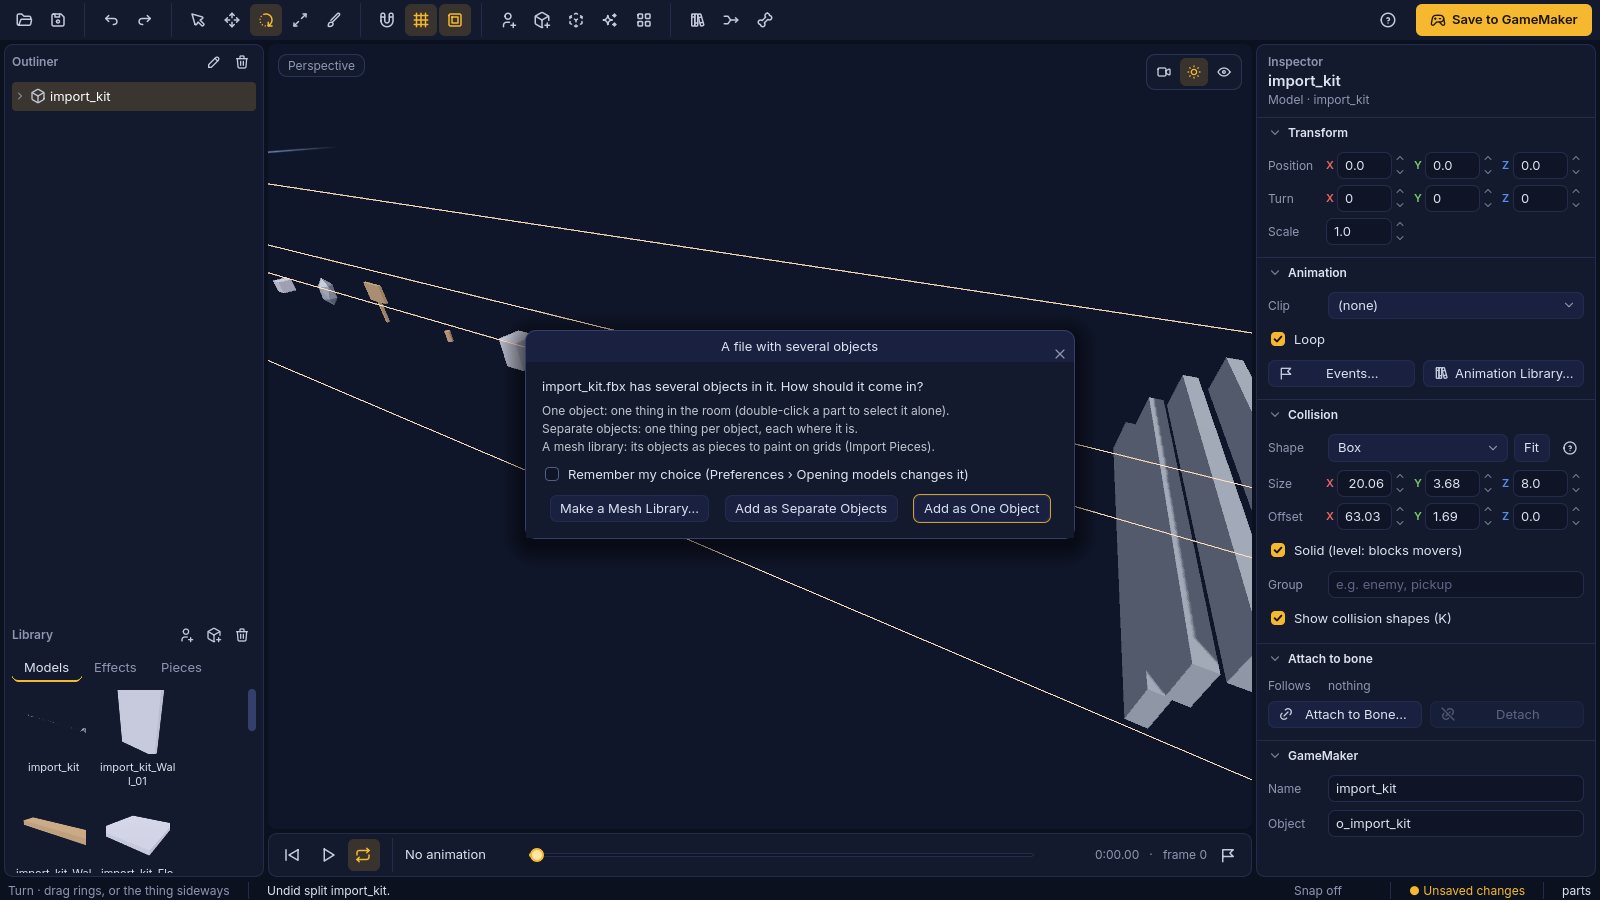
Add › Model from File… opens GLB, glTF, FBX and OBJ. Models made in centimetres or other units are shown at a person's height without changing the file. A file holding several objects (a kit, a scene) asks whether to add it as one object, as separate objects, or as a mesh library; tick Remember my choice to stop being asked.
Selecting
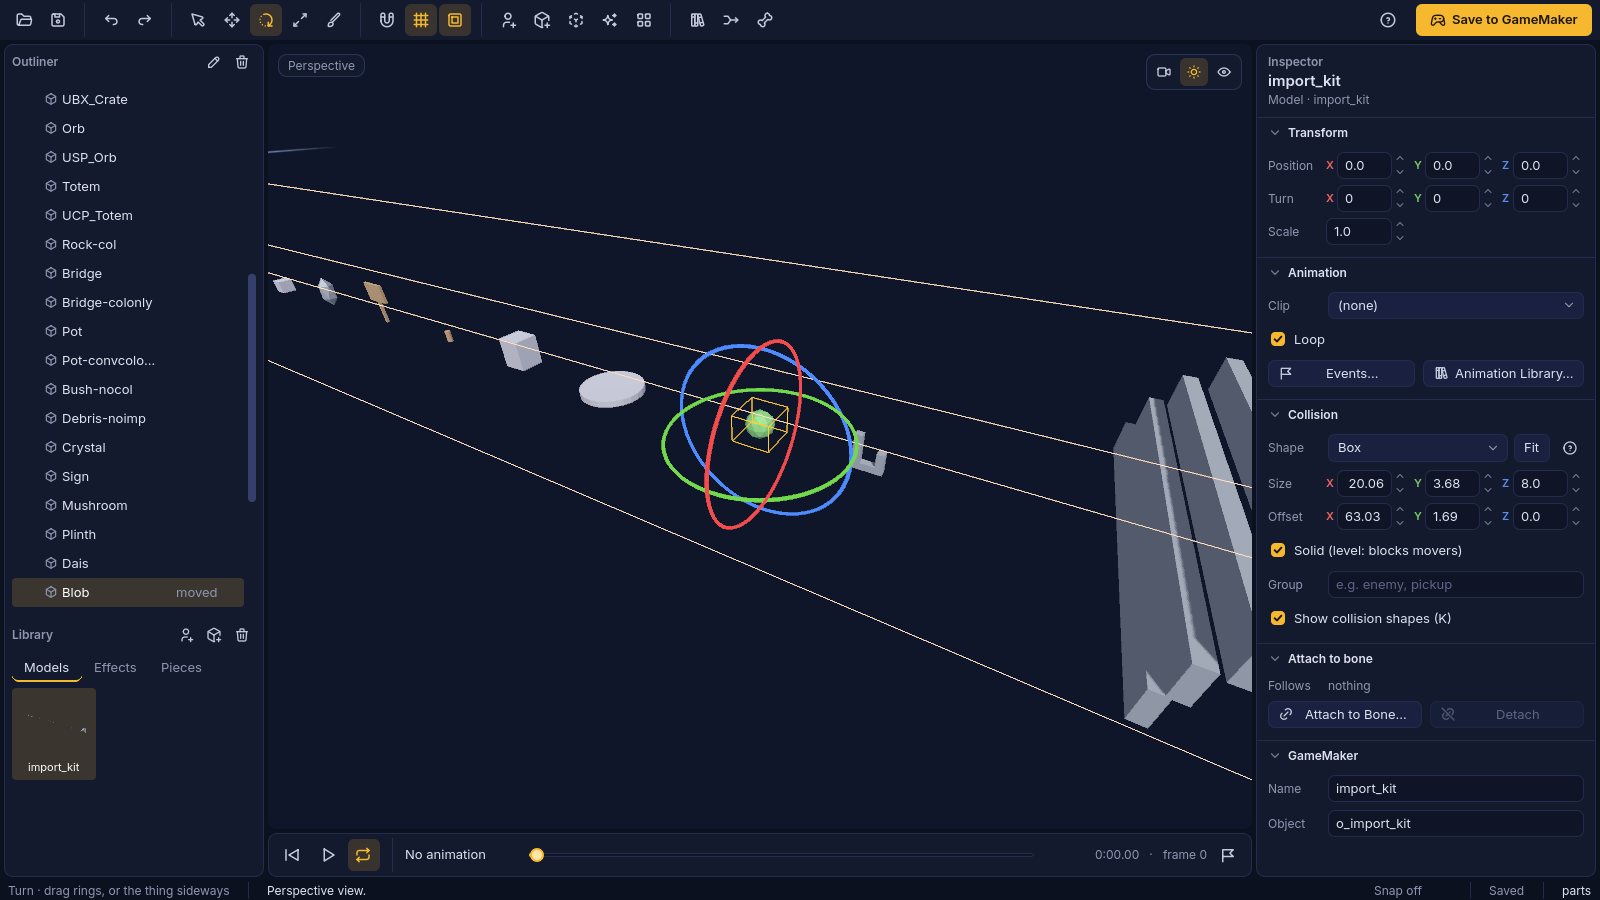
Click a thing in the view or the Outliner. A click selects a whole thing. To work on one mesh inside it, double-click it (or click its row in the Outliner); H hides that part and Alt+H resets the parts. Alt+S splits a model into separate things.
Moving, turning, scaling
- Q Select, W Move (drag an arrow for one axis, a square for a plane), E Turn (drag a ring), R Scale (drag up or down).
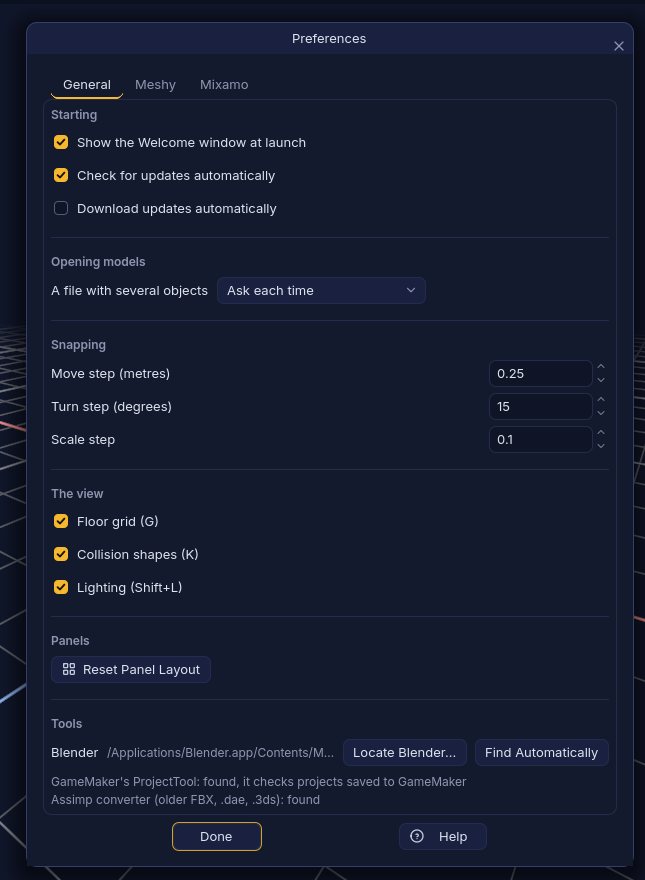
- S turns snapping on (0.25 m, 15°, 0.1 steps, set in Preferences); or hold Cmd/Ctrl while dragging.
- Type exact values in the Inspector's Transform section. Distances are metres; y is up.
- Cmd/Ctrl+D duplicates, Delete removes, F2 renames.
Views
1 front, 3 side, 7 top, 5 perspective, F frames the selection, Shift+F frames everything, G the floor grid, Shift+L lighting.
Collision
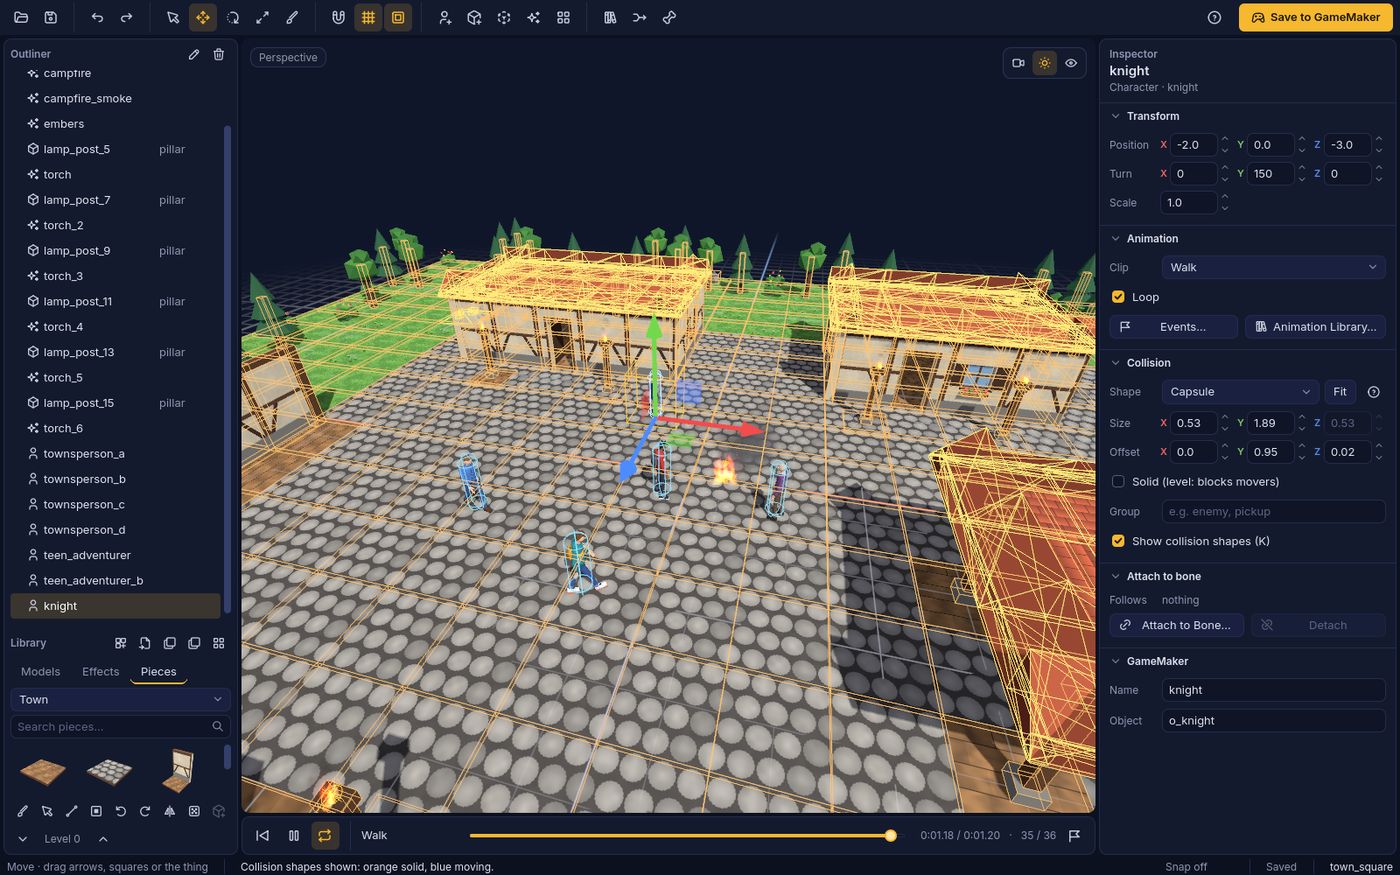
Each thing gets a 3D collision shape for GameMaker, shown with K:
- Box, Sphere, Capsule (upright, for characters), Convex (a wrapped shape, for barrels and statues) or Mesh (the model's own triangles, for ramps, stairs and rocks).
- Fit (Shift+K) fits the shape to the model; Alt+K tries the next shape.
- Solid means level geometry (walls, floors, crates) that movers can't pass. Not solid means an actor (player, enemy, pickup) that collision checks still find.
- Group is a word (enemy, pickup) your GameMaker code can look for.
Characters start with an upright capsule, other models with a solid box.
6Characters and animation
Use thousands of free Mixamo animations, your own animation files, or Meshy's library, on any humanoid: the premade characters, Mixamo characters, Character Creator 3, 4 and 5 and iClone, Unreal's Mannequin, Unity Humanoid and VRM, DAZ Genesis, Blender Rigify, VRoid, and models you rig yourself. Room 3D fits each animation to the skeleton it goes on.
Premade characters
Press C: Mannequin, Commando, Zombie, Teen Adventurer (two colour sets), Knight, Robot and Townsperson A to D. They share one skeleton and arrive playing Idle.
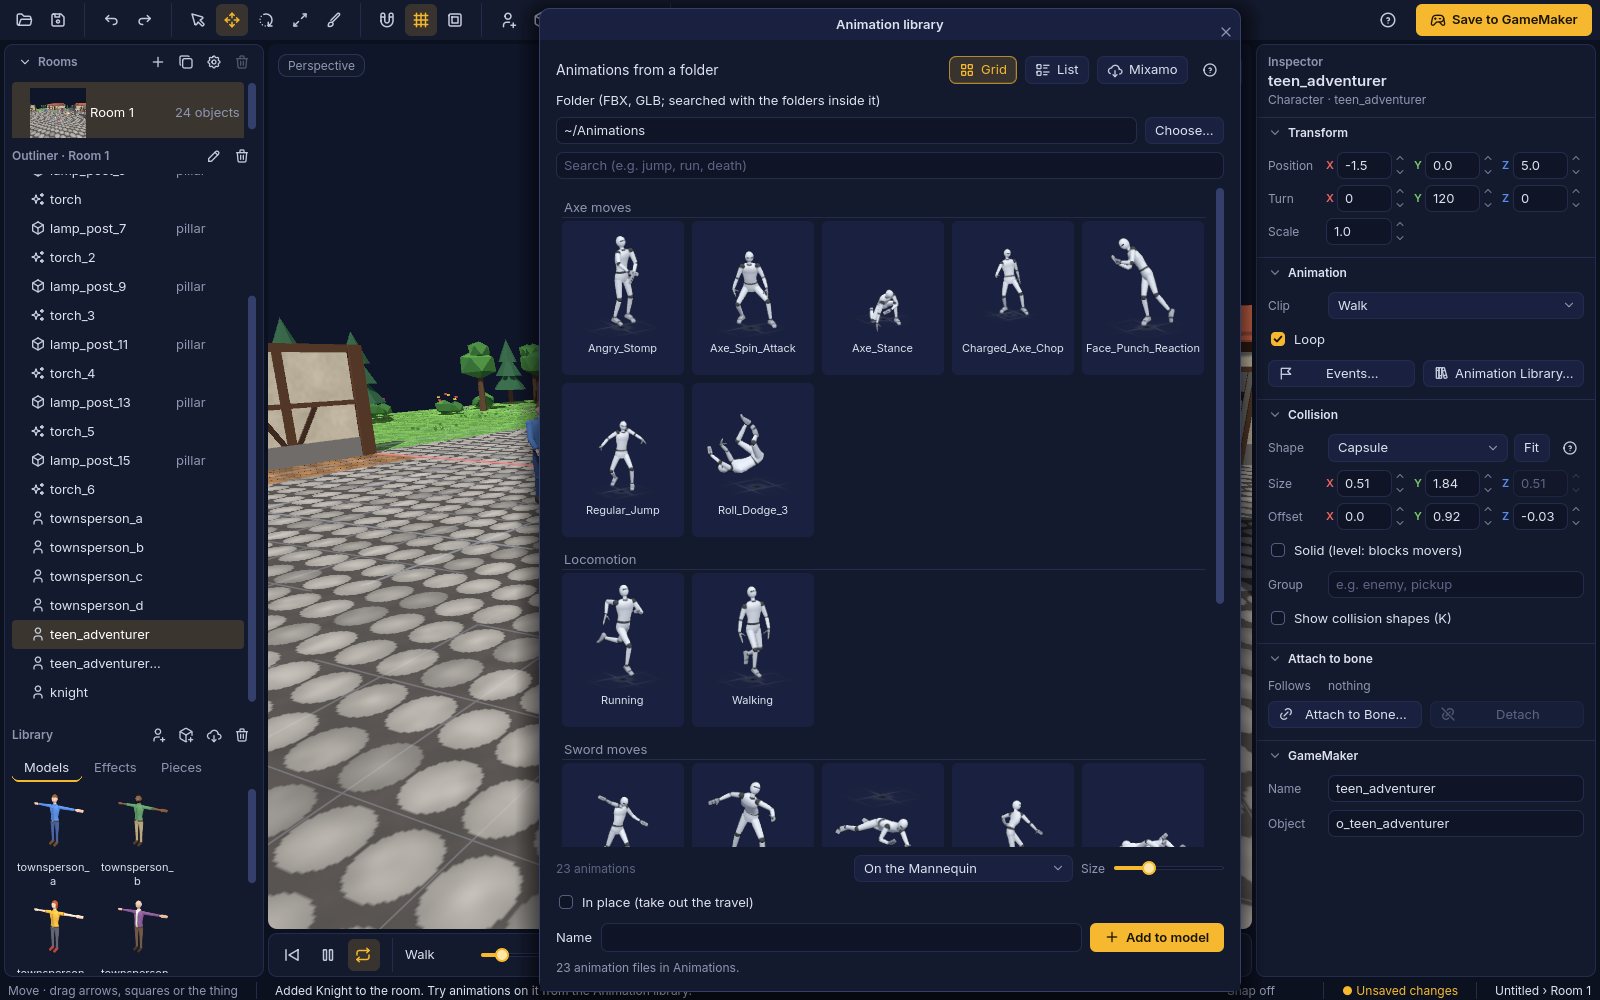
Animation library (Cmd/Ctrl+L)
- Select a character in the room.
- Search (every word must match a file or folder name: "jump", "crouch walk").
- Click an animation: the character plays it at once. Rest the mouse on a picture for a bigger preview.
- Add to model (or double-click) keeps it. Every copy of that model gets it.
The library reads your own folders of FBX, GLB and glTF animations: Mixamo downloads, animations from Meshy, or files you made or bought. Press Choose… to pick a folder; with none chosen yet, the window offers Choose a Folder…, Get from Mixamo… and Meshy…. In place takes the travel out of a walk or run.

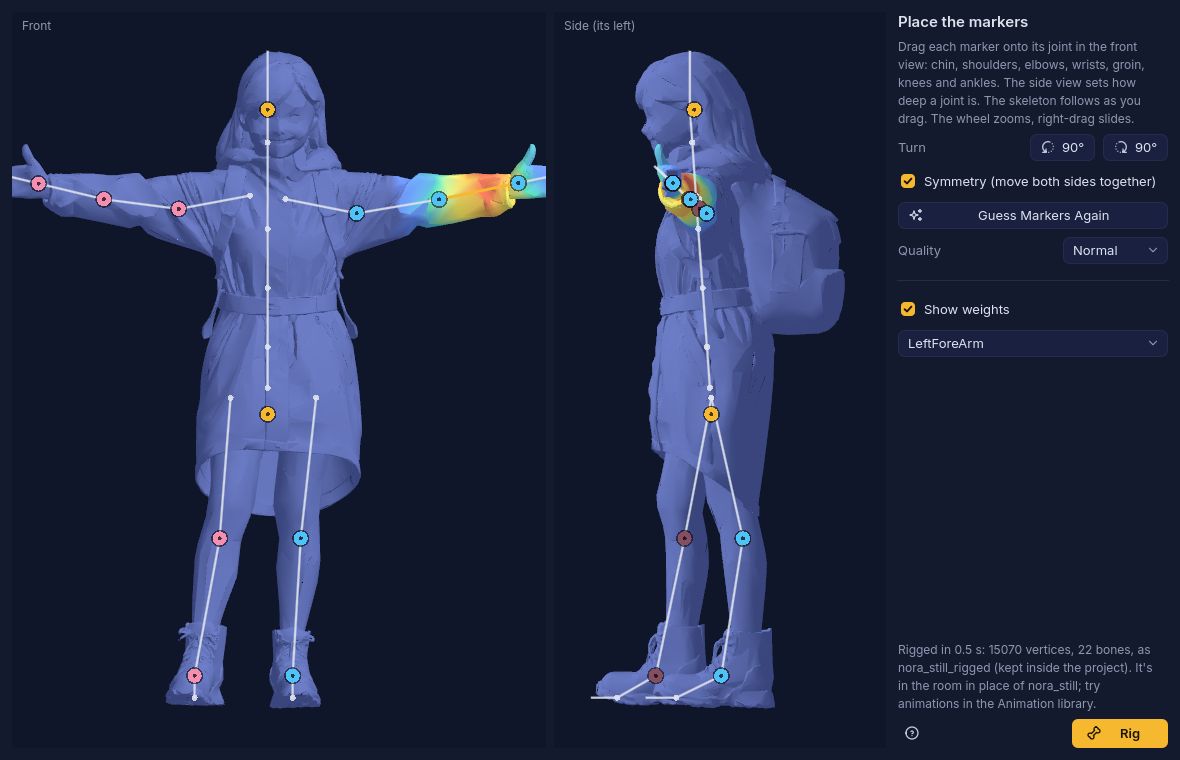
Rig Character (Shift+Cmd/Ctrl+R)
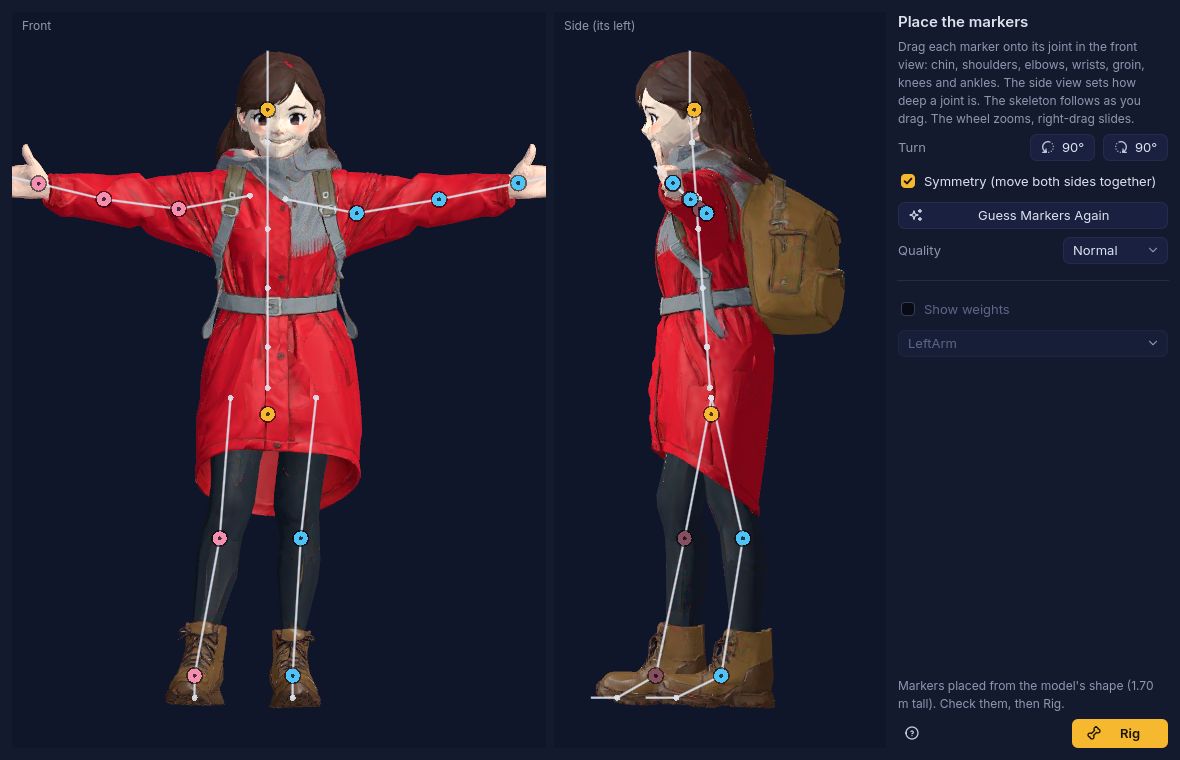
Gives a still humanoid model a skeleton:
- Select the model and choose Rig Character….
- Check the markers on chin, shoulders, elbows, wrists, groin, knees and ankles in the front and side views; drag any that are off. Symmetry mirrors your changes.
- Press Rig. The rigged model replaces the original (Undo puts it back) and the Animation library opens.
A T-pose or A-pose works best. Rigging is always free, even after the trial.
Mixamo Assistant (Alt+Cmd/Ctrl+L)
Opens mixamo.com in your browser and watches your Downloads folder. Download a character (FBX Binary, T-pose, With Skin) and it joins the Library; download animations (FBX Binary, Without Skin, 30 fps) and they go onto your character. Mixamo content is free to use in your games but can't be resold as assets; Room 3D includes none of it.
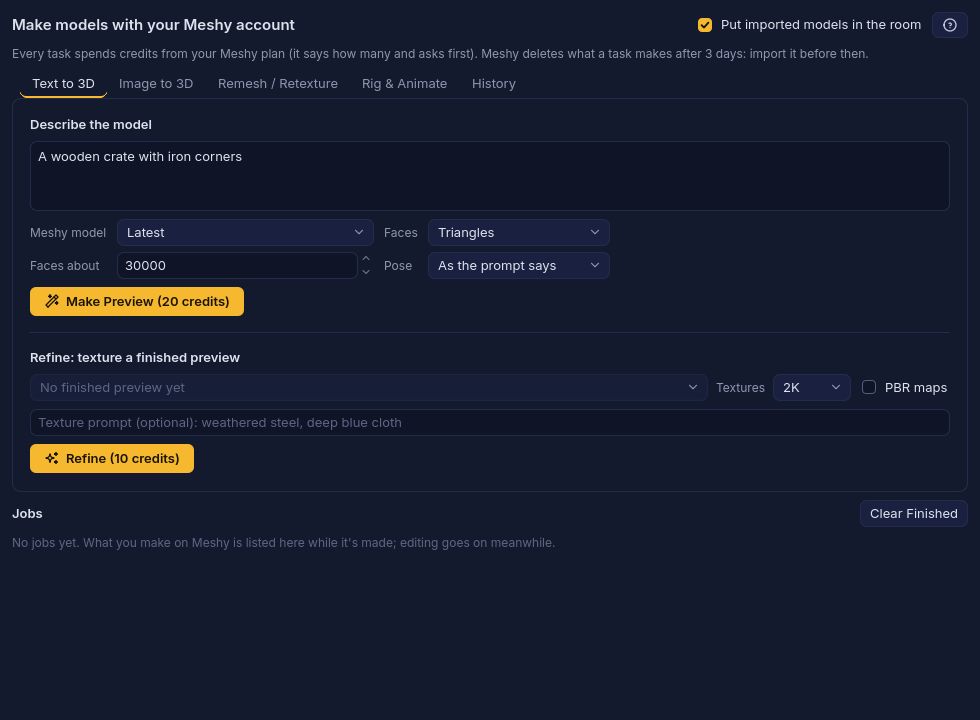
Meshy (Shift+Cmd/Ctrl+M)
Connects your own Meshy account (paste its API key in Preferences › Meshy). Make models from text or pictures, remesh, retexture, rig and animate them. Each action shows its credit cost first, and imports are kept inside your project. Meshy deletes its results after 3 days, so import them promptly.
More animation tools
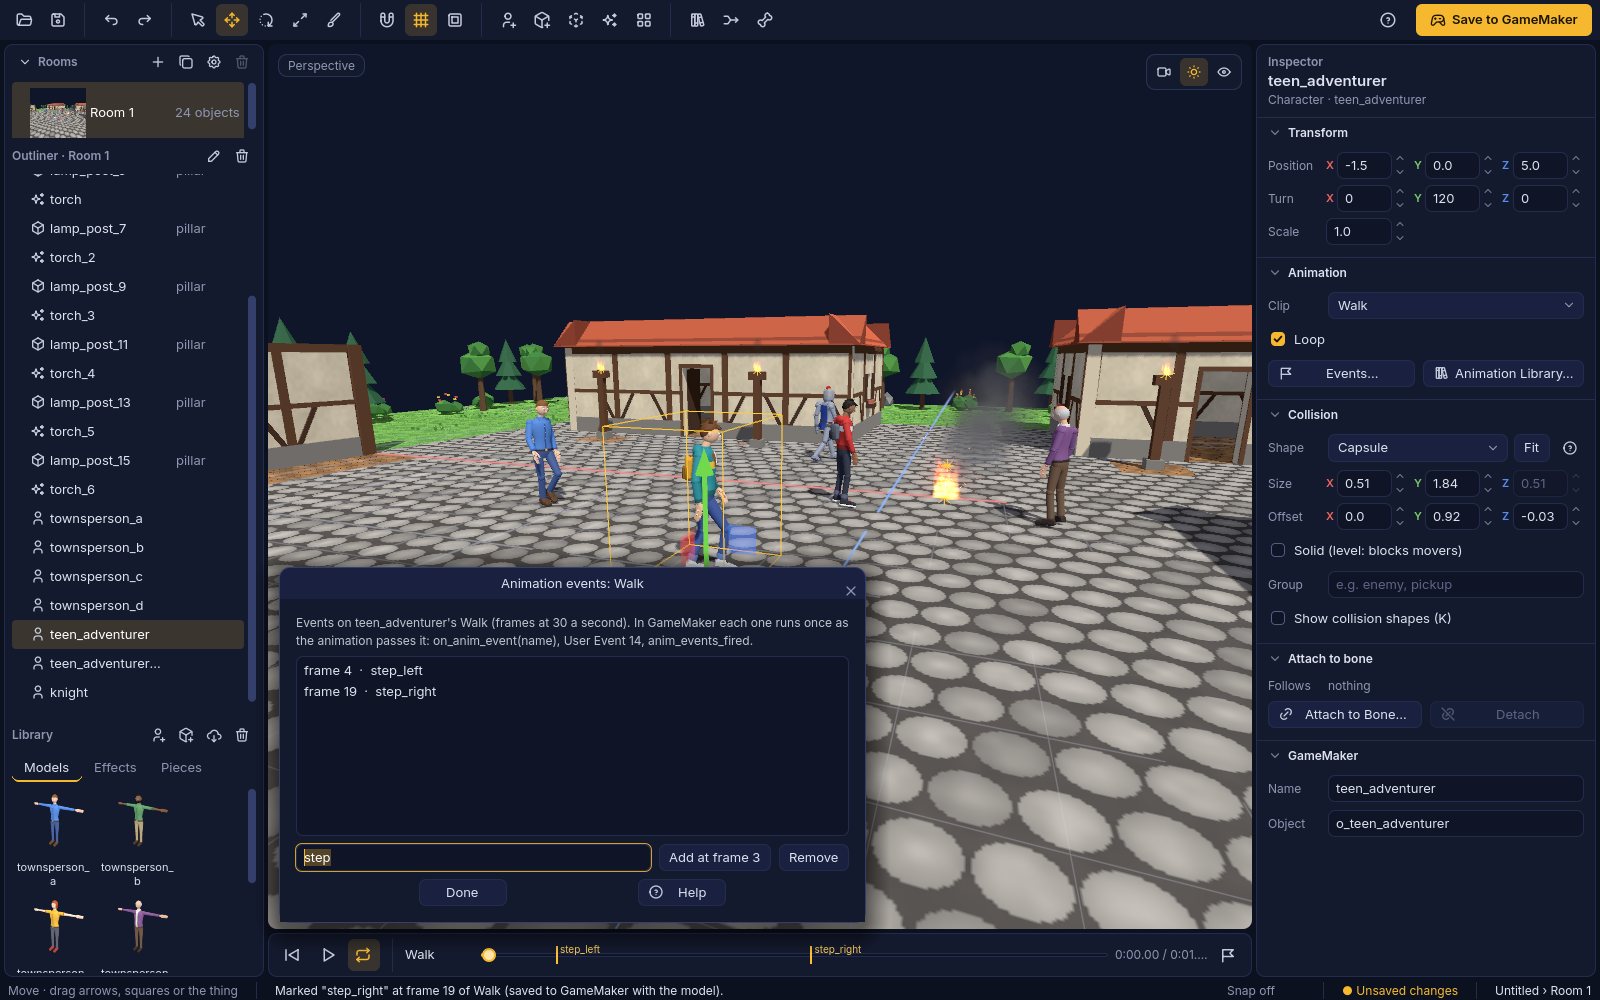
- Timeline: Space play or pause, Home go to start, L loop on or off (off plays once and holds the last frame).
- Events (M): mark named moments on frames (step, hit). GameMaker runs them as the animation passes.
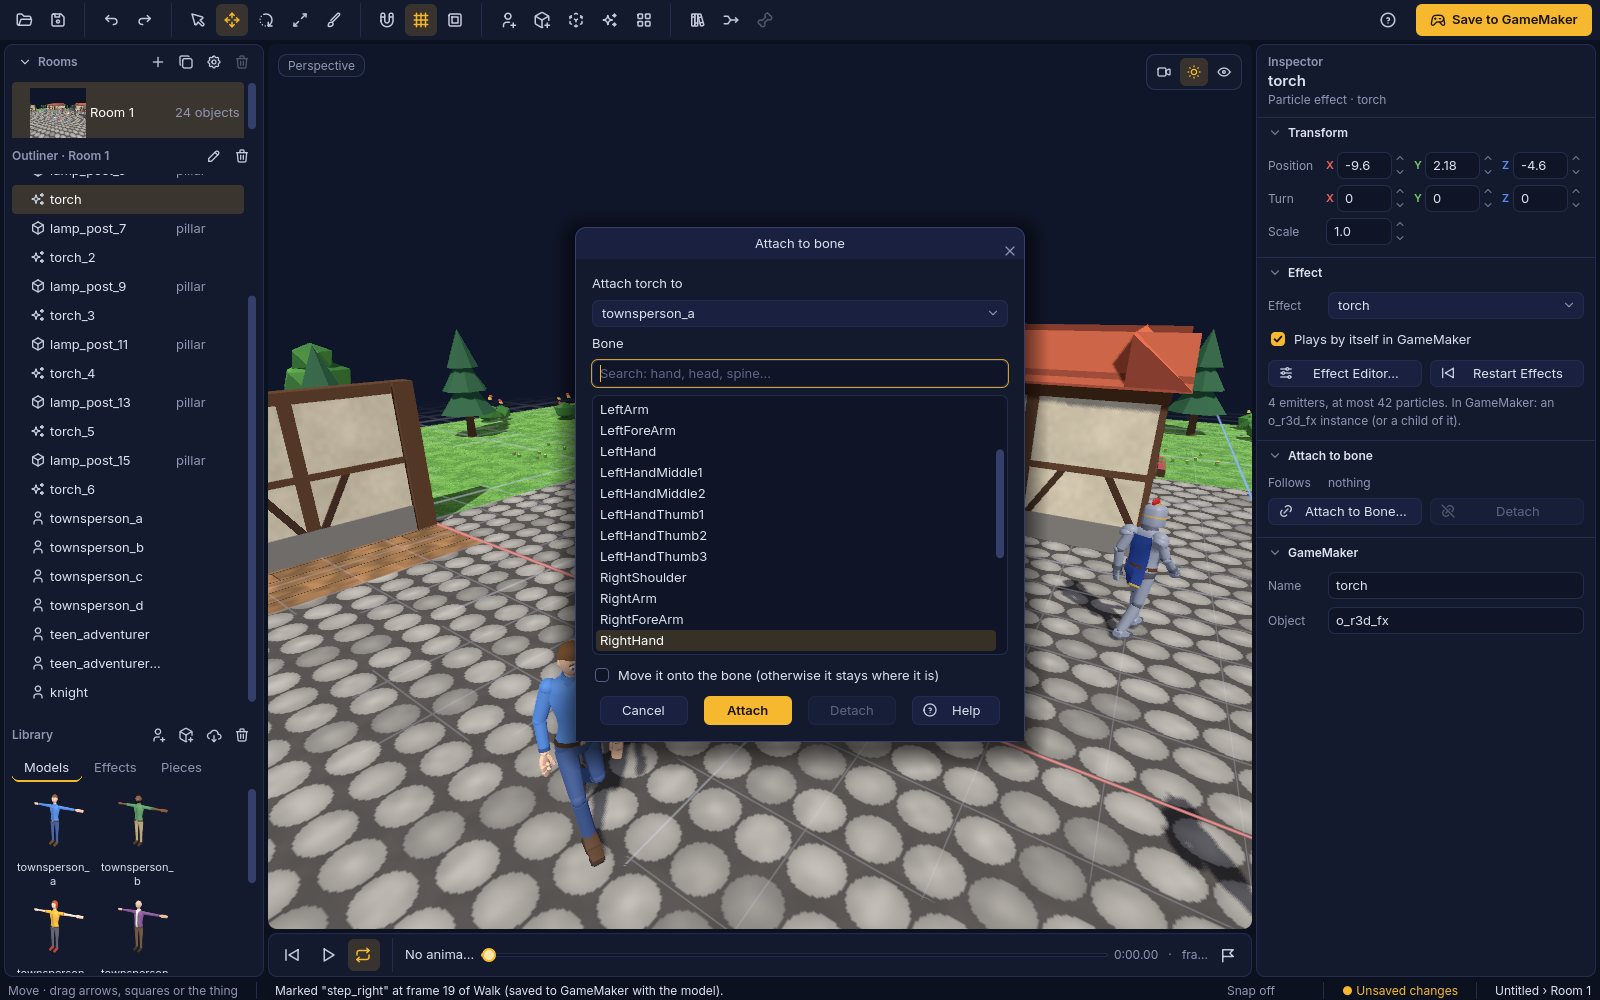
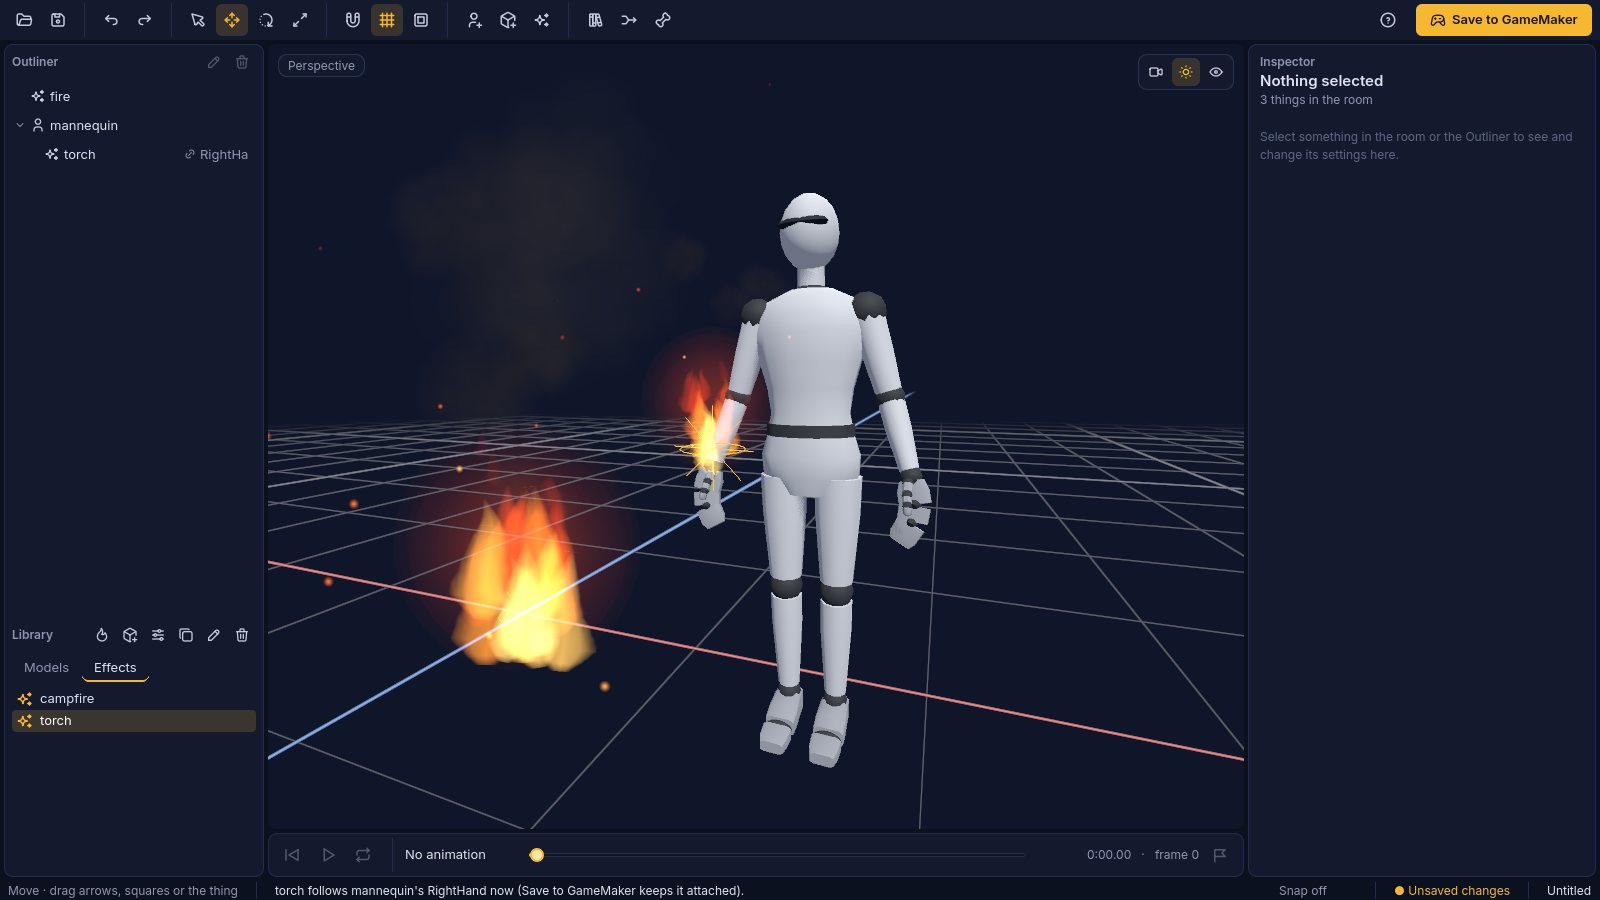
- Attach to Bone (P): a sword in a hand, a hat on a head. It follows the bone through every animation, in Room 3D and in GameMaker. Shift+P detaches.
- Combine Animations (Shift+Cmd/Ctrl+L) merges separate animation files into one model (needs Blender).
7Painting levels
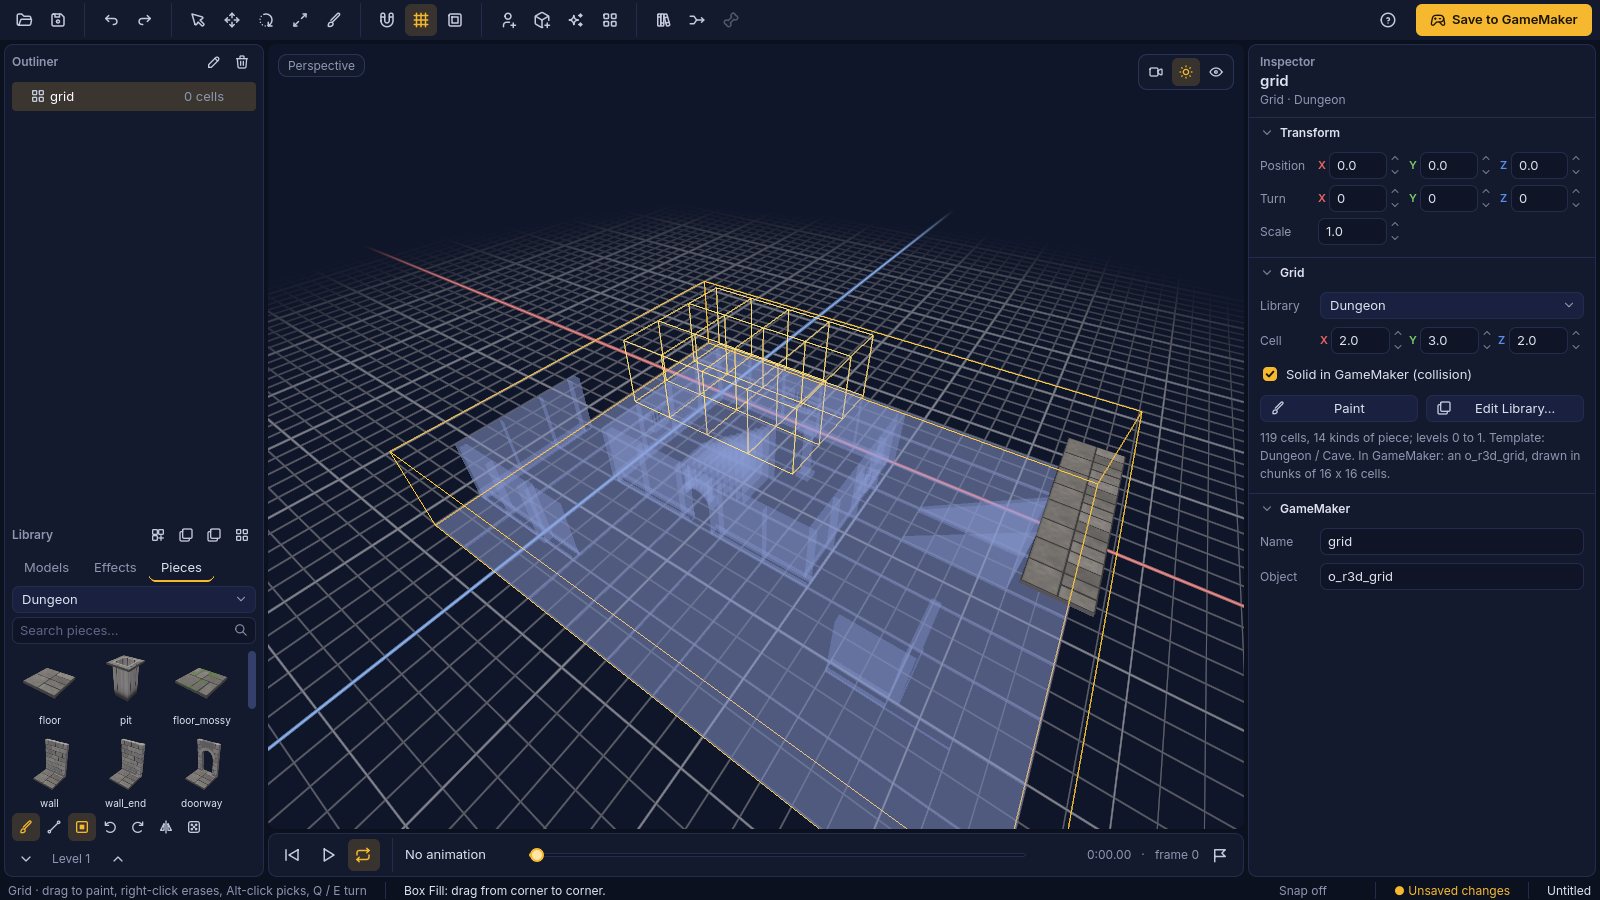
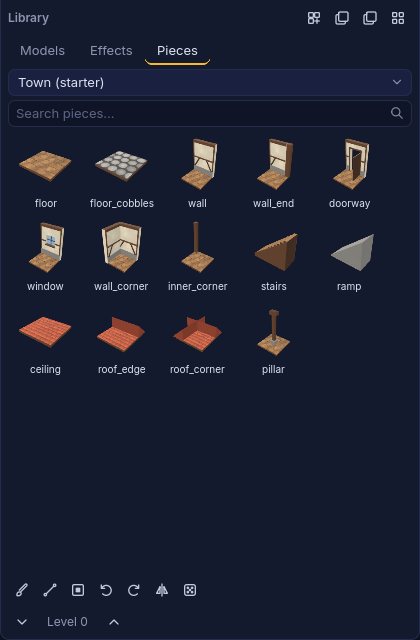
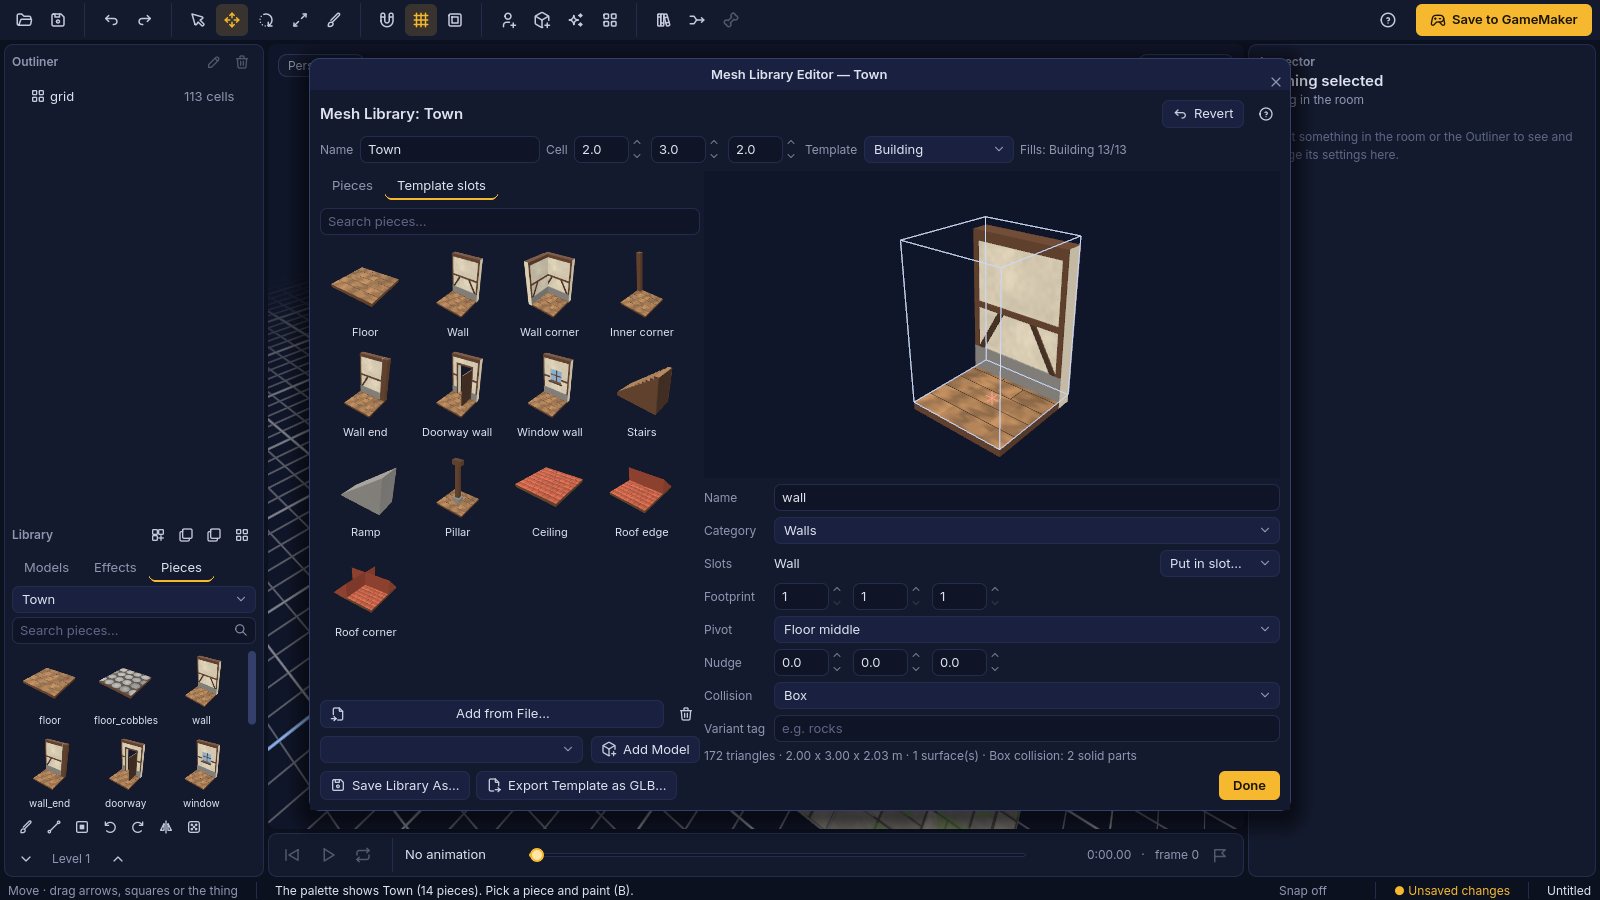
A mesh library is a set of pieces (floors, walls, corners, stairs, props) that you paint onto a 3D grid, like Godot's GridMap. Four starter libraries come with Room 3D: Dungeon, Sci-fi base, Town and Nature.
Painting (B for the Grid Paint tool)
- In the Library's Pieces tab, pick a library and click a piece.
- Click or drag in the view to paint. Each stroke is one undo step.
- Q / E turn the piece, T mirrors it, Y gives random variants (good for rocks and trees).
- N draws a line, U (or holding Shift) fills a box.
- Right-click (or Cmd/Ctrl-drag) erases; Alt-click picks up a cell's piece.
- PgUp / PgDn change the level; floors below show as a ghost.

Moving painted pieces
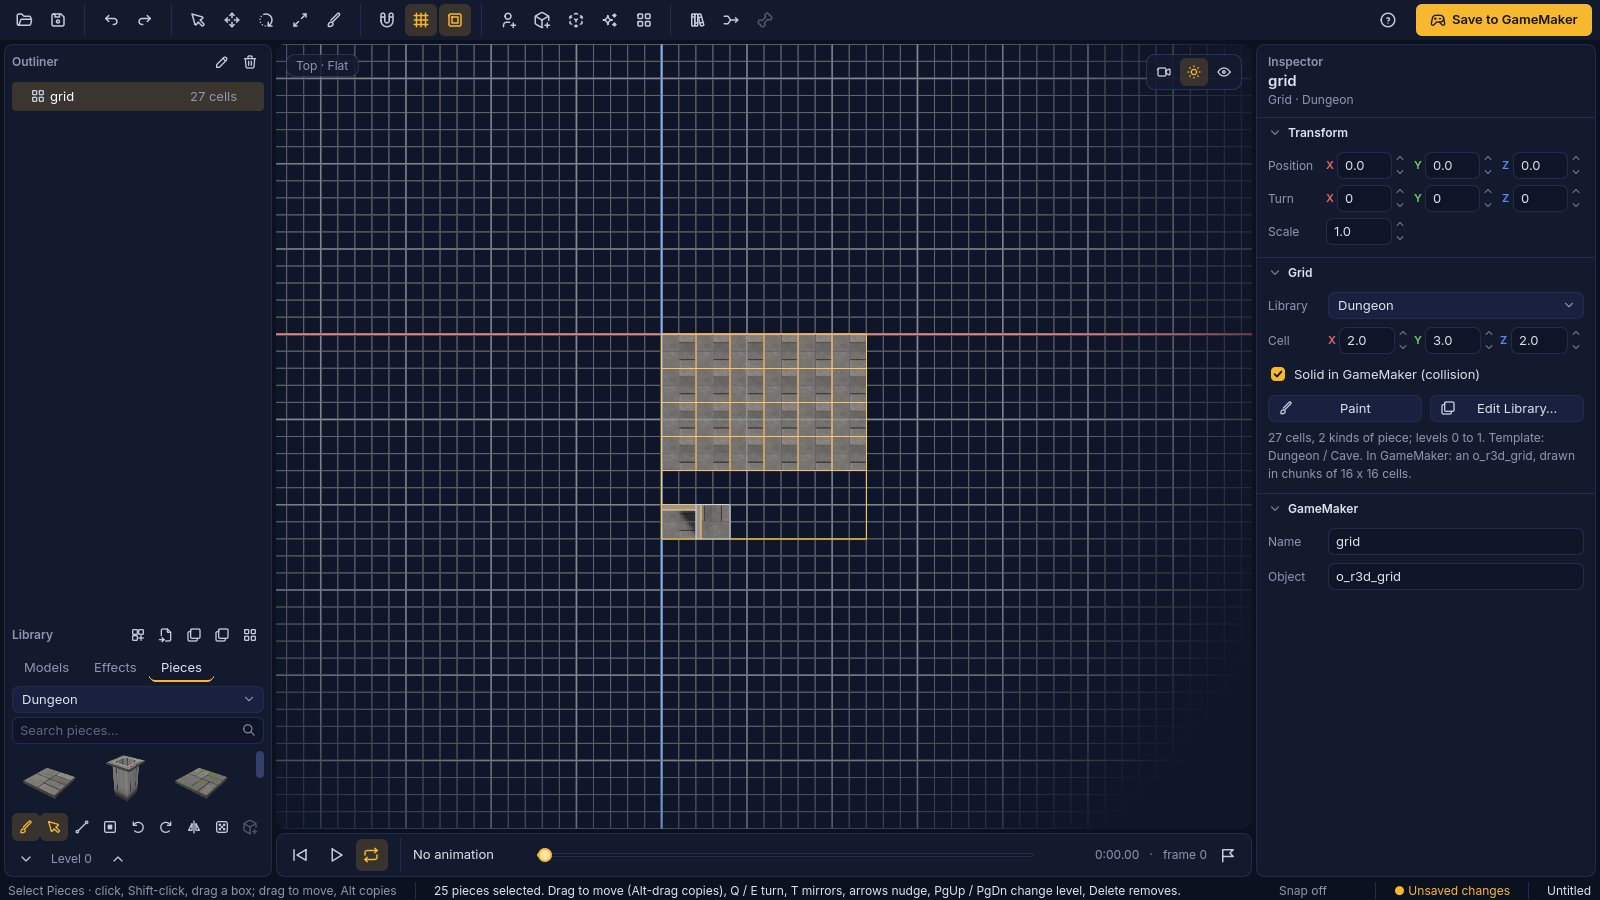
Double-click a piece (or press V in the Grid tool) to select it; Shift-click or drag a box for more. Drag to move them a whole cell at a time (red means the spot is taken). Alt-drag copies, arrows nudge, Delete removes. Alt+D detaches pieces to place them freely; Alt+G snaps one back; Shift+O places a library piece as a free object.
Templates and re-theming
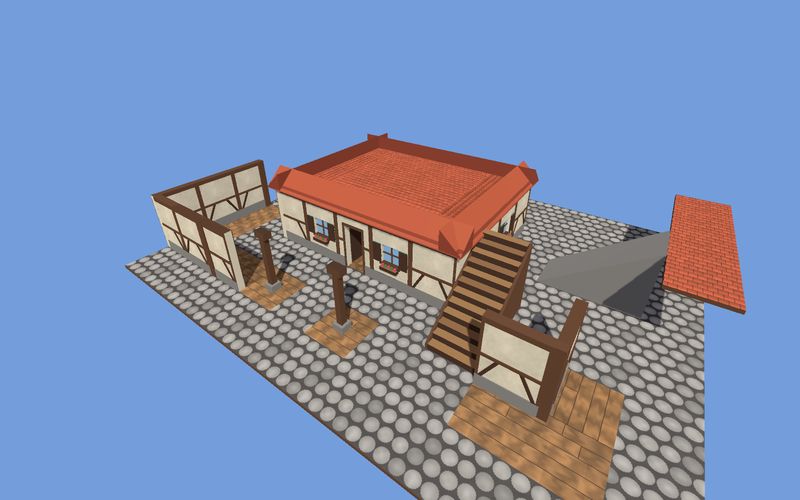
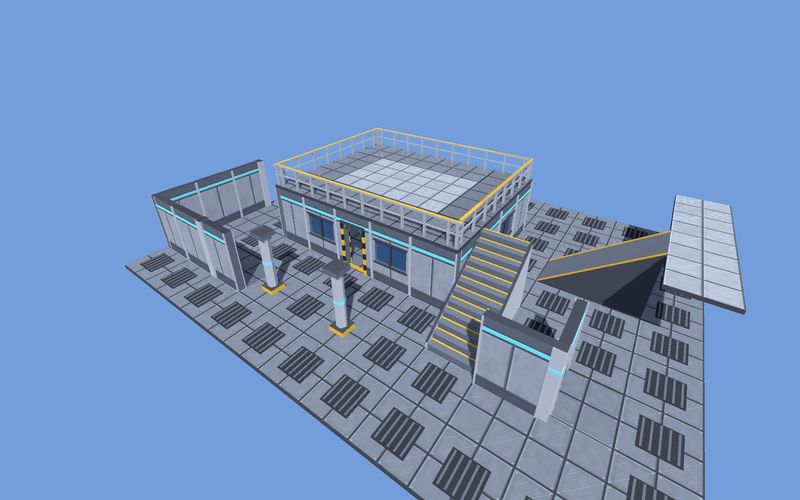
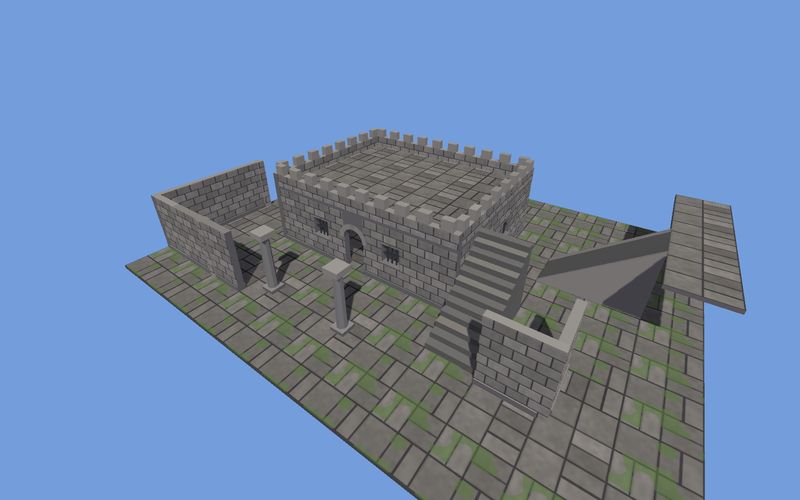
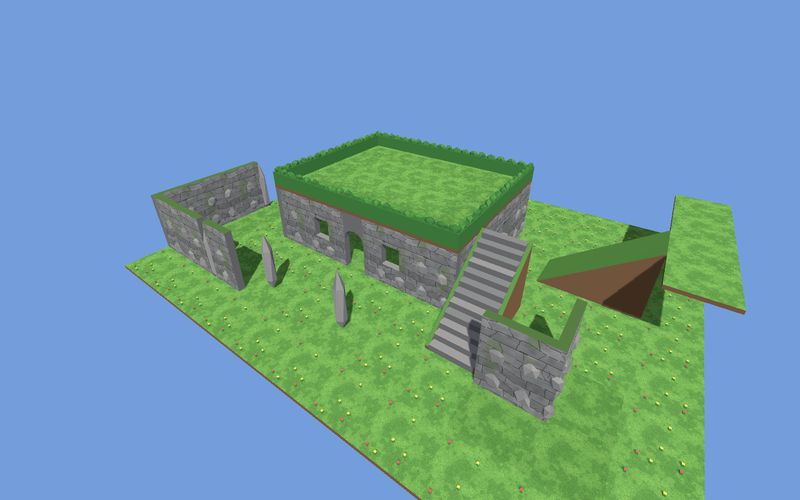
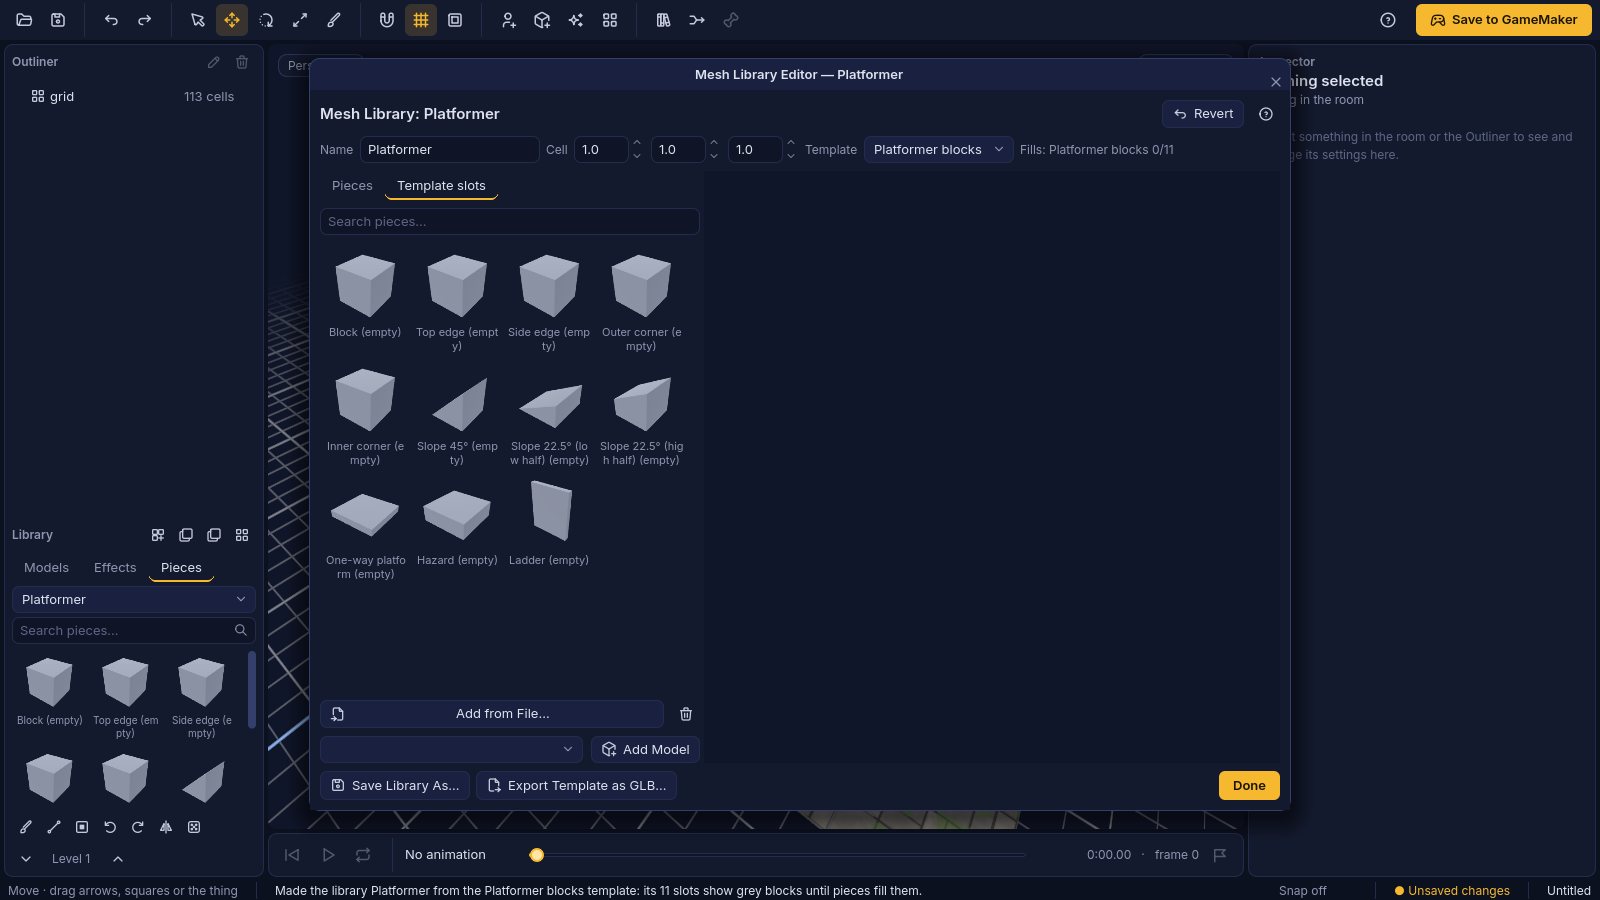
Templates are standard sets of slots with grey placeholder blocks: Building, Dungeon / Cave, Platformer blocks, Terrain / Nature, or an Empty one you define. Painted cells remember the slot, so choosing another library of the same template in the Inspector re-themes the whole level in one click. All four starter libraries fill the Building template, so one building can be a town house, a sci-fi base, a dungeon or a nature ruin. Export Template as GLB gives artists the placeholder blocks to model over.
Making your own library
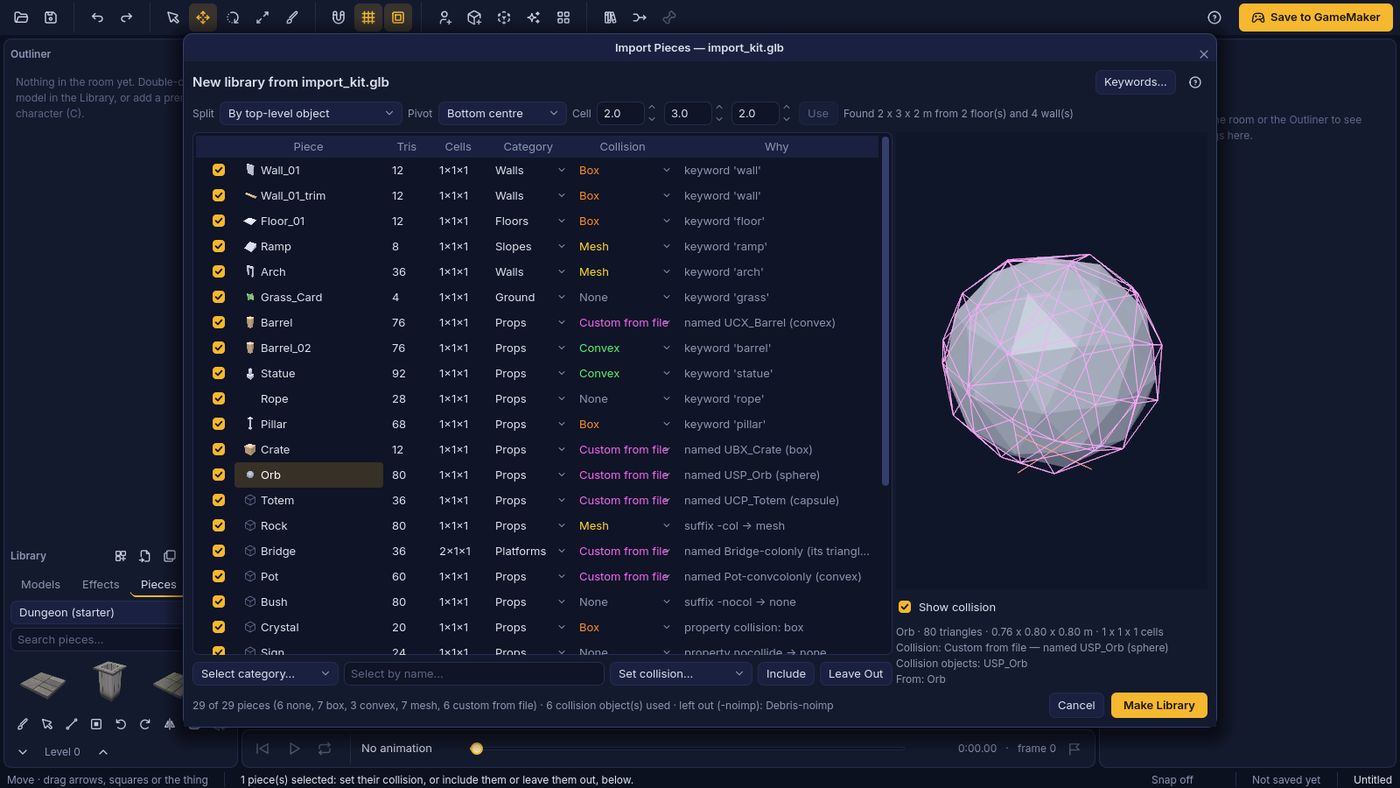
New Library from File… (Shift+Cmd/Ctrl+B) opens Import Pieces, which splits a kit file into pieces and chooses each piece's collision, showing why:
- Collision objects in the file (
UCX_,UBX_,-col,-nocoland similar, as Unreal, Unity and Godot name them). - Custom properties set in Blender (
collision = box). - Name keywords: grass and rope get none; wall and floor get a box; ramp, stairs and rock get exact mesh; barrel and statue get convex.
- The shape itself when nothing else applies.
You can override any piece. Reimport updates the library after you change the file, keeping your choices. Room 3D also opens Godot MeshLibrary files and GridMap scenes directly.
8Particle effects
Room 3D makes 3D particle effects for GameMaker, which only has flat particles, and what you see in the editor is what plays in the game.
Adding one
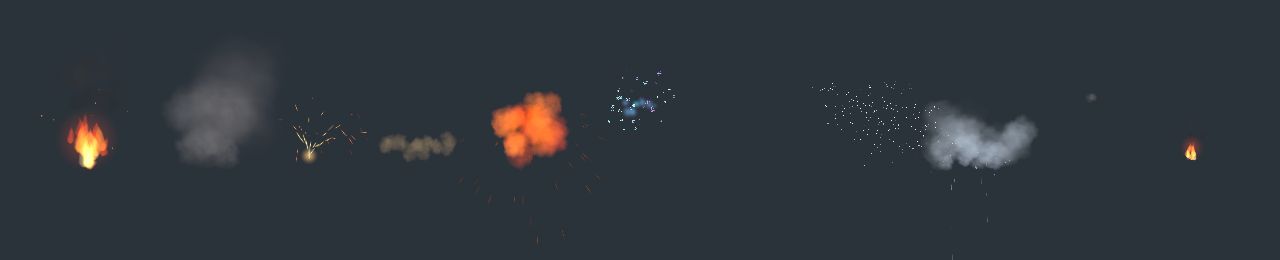
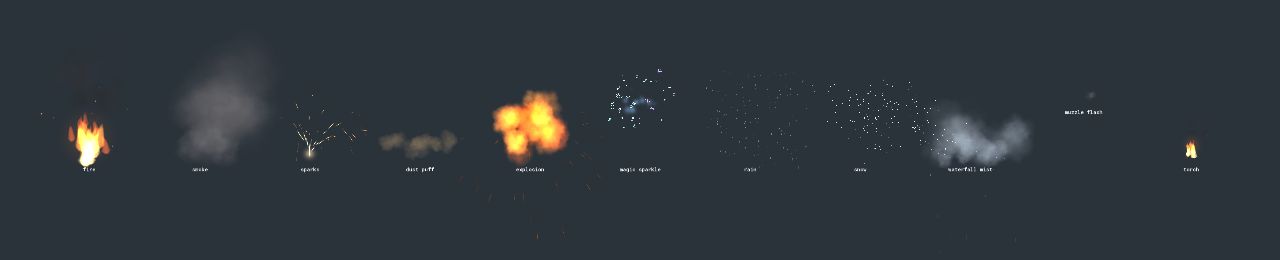
Press X and pick a preset: fire, smoke, sparks, dust puff, explosion, magic sparkle, rain, snow, waterfall mist, muzzle flash or torch. It appears in the view with a gold star; move, turn and size it like any thing, or Attach to Bone (P) to put a torch in a hand.

Editing (Shift+X for the Effect Editor)
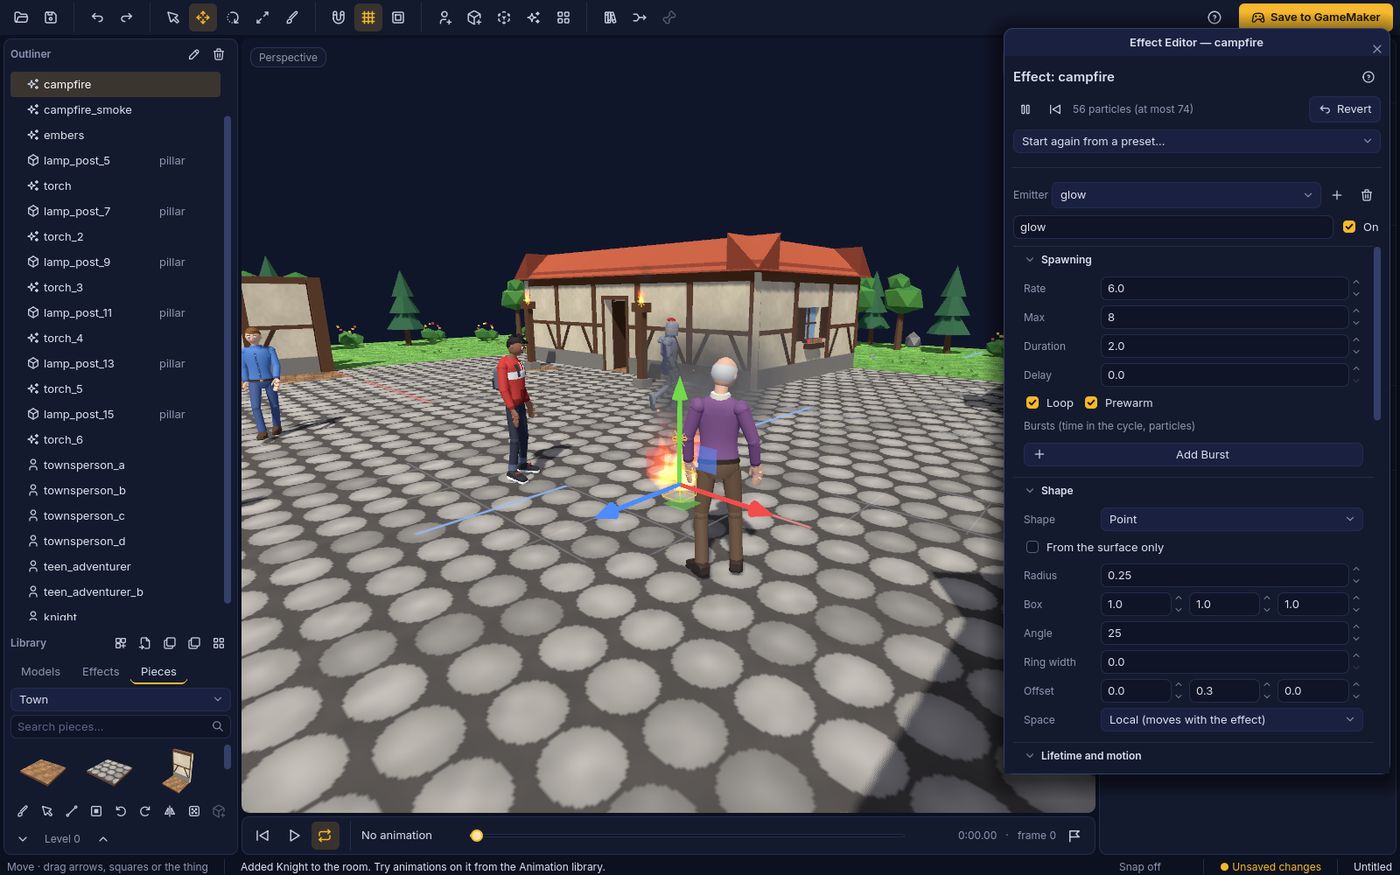
An effect has up to six emitters (a campfire: glow, flames, embers, smoke). For each emitter you set:
- Spawning: rate, maximum alive, duration, delay, loop or once, prewarm, bursts.
- Shape: point, sphere, box, cone or ring; local space (moves with the effect) or world space (leaves a trail).
- Motion: life, speed, direction and spread, gravity, drag, wind, swirl, wobble.
- Look: texture (soft dot, smoke puff, spark, flame flipbook, snowflake, raindrop, ring, or your own PNG), additive or alpha blending, facing the camera or stretched along the motion, spin.
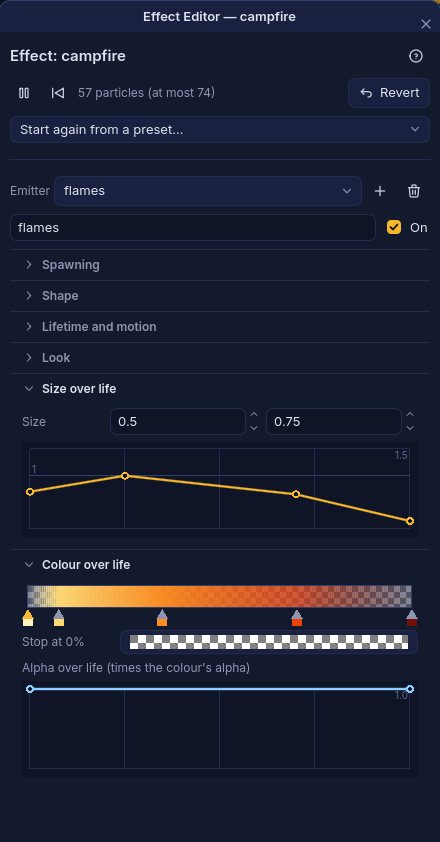
- Over life: a size curve and a colour-and-alpha gradient.
Changes show live on every copy in the room. Shift+Space plays or pauses effects, Shift+Home restarts them.
In GameMaker
Effects are computed on the graphics card, so many of them cost little. Ones placed in the room play by themselves (if ticked); in code, r3d_fx_play("fire", x, y, z) starts one and r3d_fx_burst("explosion", x, y, z) plays one once.
9Rooms and projects
A project (.r3d) holds one or more rooms (levels, a menu scene, a boss arena) that share the same models, animations, effects and mesh libraries.
Rooms panel (top left)
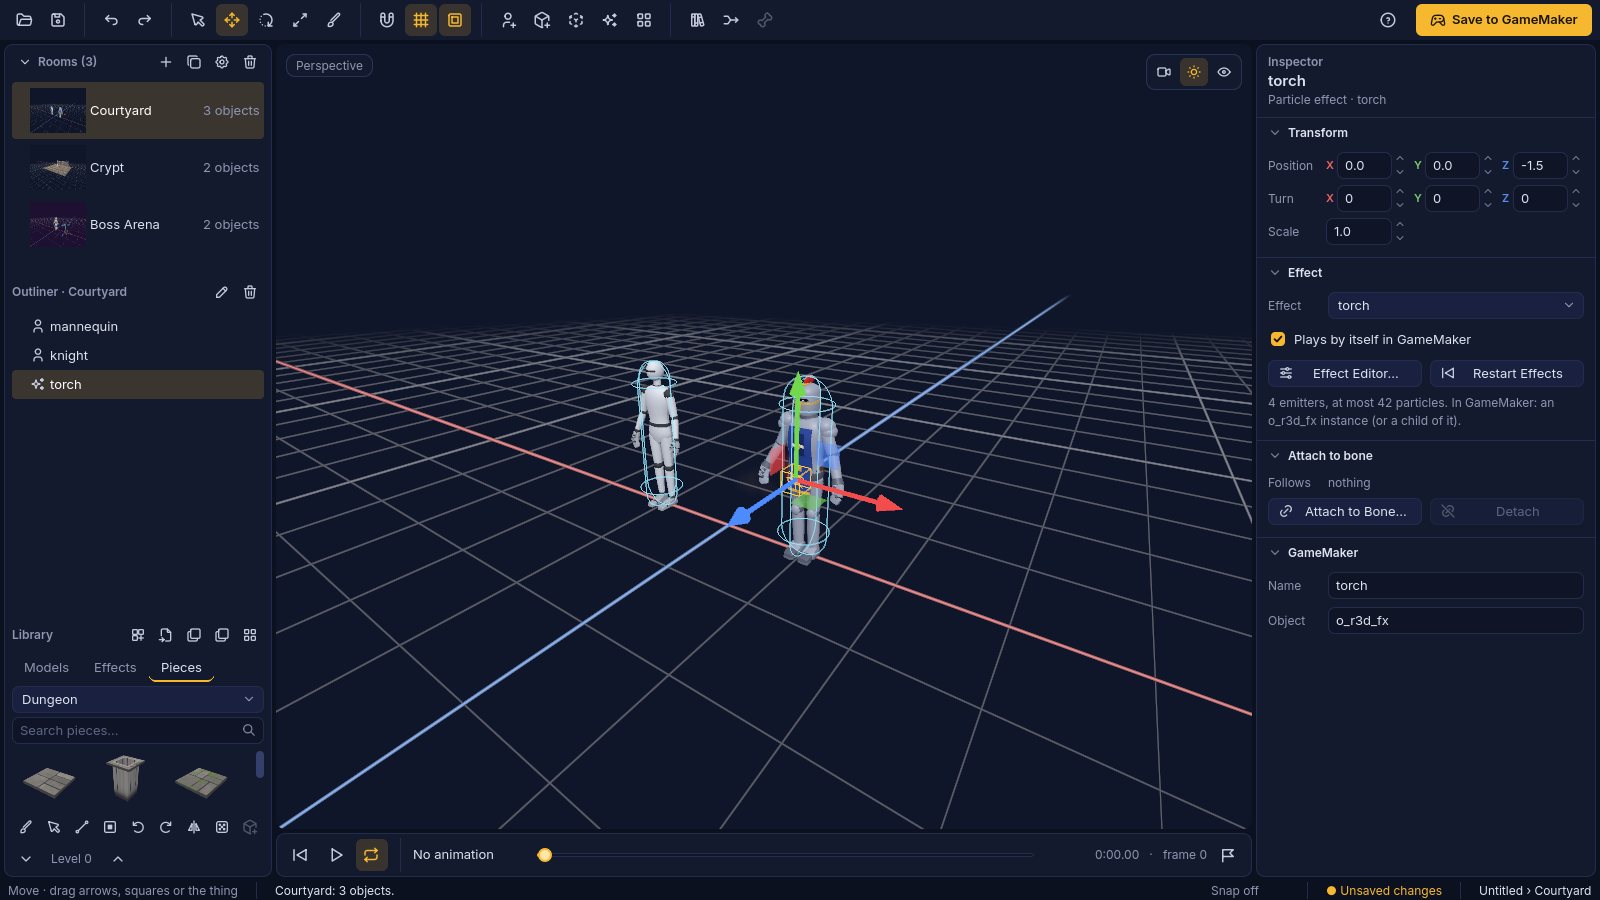
Click a room to open it and the Outliner shows its objects. Double-click to rename, drag to reorder, right-click for more.
- New Room (Alt+Cmd/Ctrl+N), Duplicate Room (Shift+Cmd/Ctrl+D), Delete Room (undoable).
- Next / Previous Room: Alt+Cmd/Ctrl+PgDn / PgUp.
- Room Settings (Alt+Cmd/Ctrl+,): its GameMaker room name, backdrop colour and size.
- Copy and paste things between rooms with Cmd/Ctrl+C / V; attached items come along.
- One undo history covers all rooms; undoing a change from another room opens that room first.
Saving projects
Cmd/Ctrl+S saves, Shift+Cmd/Ctrl+S saves as. Save As and Collect Model Files copies your model files beside the project so the folder can move to another computer. Rigged, Meshy and Mixamo models are kept inside the project file. Every save is written beside the old file and checked first; if it fails (a full disk, say) the old file stays exactly as it was.
Opening rooms back from GameMaker
File › Open GameMaker Project… (Shift+Cmd/Ctrl+O) lists a project's rooms; tick the Room 3D ones to bring them in with their models, animations, collision, effects and grids. Reload Room from GameMaker (Alt+Cmd/Ctrl+R) picks up objects you moved in GameMaker's room editor. The GameMaker project is only read, never changed.
10Saving to GameMaker and using it in code
Save Room to GameMaker (Cmd/Ctrl+E, the gold button) asks for your project's .yyp and a room name, then adds to the project without removing anything of yours:
- the models, baked with all their animations and events, in
datafiles/room3d/; - the Room 3D kit: the script
scr_r3d, its shaders and the objectso_r3d_thingando_r3d_scene(rewritten on each save, so don't edit them; make your own objects children ofo_r3d_thing); - an object for each thing type the project doesn't have yet;
- the room itself, with each thing's model, animation, position, turn, size, collision and attachments, and a camera where your view is;
- painted grids, baked into fast chunks, and particle effects.
Layers you add to the room in GameMaker (a HUD, a controller) and the room's creation code are kept on later saves. Save All Rooms saves every room; Save Model to GameMaker (Shift+Cmd/Ctrl+E) adds just one model for use in your own rooms. Units: 64 GameMaker units per metre, z is up.
The most useful kit functions
| Function | What it does |
|---|---|
r3d_play(anim, loop, blend) | Play an animation, blending from the current pose |
on_anim_event = function(name) | Runs at each event you marked (step, hit) |
on_anim_end = function(anim) | Runs when a play-once animation finishes |
r3d_move(inst, dx, dy, dz) | Move with 3D collision: slides along walls, climbs steps and slopes, falls off edges |
r3d_on_ground(inst) | Whether it stands on something walkable |
r3d_collide(inst, group) | Everything its shape touches now |
r3d_raycast(x, y, z, dx, dy, dz, dist) | The first shape along a ray |
r3d_attach(child, parent, bone) | Make something follow a bone |
r3d_create(x, y, z, model, anim) | Make a 3D thing in code |
r3d_lighting(true), r3d_sun(...), r3d_light_add(...), r3d_fog(...) | Night scenes, torches, fog |
r3d_fx_play(name, x, y, z) | Start a particle effect |
r3d_grid_get(grid, cx, cy, cz), r3d_grid_set(...) | Read or change a painted level at runtime |
A minimal player
An object that's a child of o_r3d_thing:
// Create
event_inherited(); vz = 0;

// Step
event_inherited();
vz -= 9.8 * 64 * dt;
if (on_ground && keyboard_check_pressed(vk_space)) vz = 256;
r3d_move(id, mx, my, vz * dt);
r3d_play(moving ? "Walk" : "Idle");
o_r3d_scene.follow = id; makes the room's camera follow it.
11Licence, trial and updates
Trial and free mode
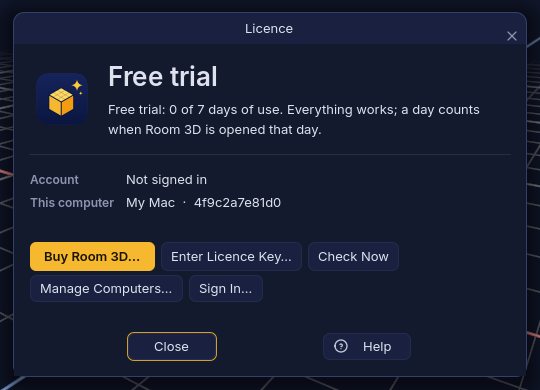
Everything works for 7 days of use; the status bar shows "Trial: 3 of 7 days used". Afterwards Room 3D stays usable in free mode: only the three exports need a licence, and nothing you made is ever locked away.
Licence
Buy Room 3D once on guidrygames.com (Help › Buy Room 3D…): a one-time purchase, $29.99 at launch. Then sign in to Room 3D with the same Guidry Games account (Help › Sign In…) and the licence arrives by itself. A licence covers two computers; free one under Manage Computers on the website. Licence keys (R3D-XXXXX-XXXXX-XXXXX-XXXXX) go in Help › Enter Licence Key…. Room 3D checks the licence every few days and works offline for 30 days.
Updates
Room 3D checks guidrygames.com at most once a day (or Help › Check for Updates…). When a new version is out:
- Download and Install fetches the right file for your computer with a progress bar.
- Room 3D verifies it: its size and fingerprint must match update information signed by Guidry Games, and on a Mac Apple's signature and notarization are checked too.
- Install and Restart asks to save your work, swaps in the new version and reopens your project.
- If the new version doesn't start properly, the old one is put back automatically.
Skip This Version and Remind Me Tomorrow are always offered; important updates are marked but never forced.
Help
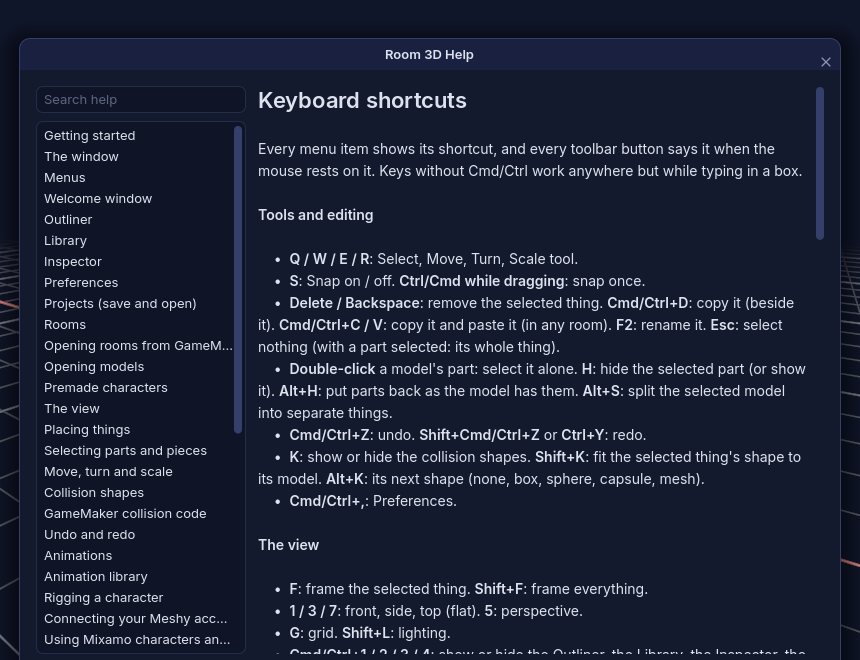
F1 opens the searchable help, Shift+F1 the web manual, Cmd/Ctrl+/ every shortcut, and Help › Report a Problem… starts an email to hello@guidrygames.com with your version details filled in.
12Keyboard shortcuts
Cmd on a Mac, Ctrl on Windows and Linux. Cmd/Ctrl+/ in the app lists every one.
| Task | Keys |
|---|---|
| Undo / redo | Cmd/Ctrl+Z / Shift+Cmd/Ctrl+Z |
| Save project / Save to GameMaker | Cmd/Ctrl+S / Cmd/Ctrl+E |
| Add model from file / premade character | Cmd/Ctrl+I / C |
| Select, Move, Turn, Scale tools | Q, W, E, R |
| Snap on or off | S |
| Duplicate / delete / rename | Cmd/Ctrl+D / Delete / F2 |
| Front, side, top, perspective view | 1, 3, 7, 5 |
| Frame selection / frame all | F / Shift+F |
| Grid / collision shapes / lighting | G / K / Shift+L |
| Fit collision / next collision shape | Shift+K / Alt+K |
| Animation library / Mixamo Assistant | Cmd/Ctrl+L / Alt+Cmd/Ctrl+L |
| Rig Character | Shift+Cmd/Ctrl+R |
| Play or pause / go to start / loop | Space / Home / L |
| Events / attach to bone / detach | M / P / Shift+P |
| Particle effect / effect editor | X / Shift+X |
| Grid Paint tool / Select Pieces | B / V |
| Line brush / box fill / random variants | N / U / Y |
| Turn piece / mirror piece | Q, E / T |
| Level up / level down | PgUp / PgDn |
| Detach pieces / snap back / place as object | Alt+D / Alt+G / Shift+O |
| New room / next room / previous room | Alt+Cmd/Ctrl+N / Alt+Cmd/Ctrl+PgDn / Alt+Cmd/Ctrl+PgUp |
| Open GameMaker project / reload room | Shift+Cmd/Ctrl+O / Alt+Cmd/Ctrl+R |
| Meshy window | Shift+Cmd/Ctrl+M |
| Preferences | Cmd/Ctrl+, |
| Help / web manual | F1 / Shift+F1 |
This guide covers the essentials. The full manual has every window, tool, setting and shortcut, the same as Room 3D's own Help.